Can you design Netflix in 45 minutes?
What??? Are you serious ?? (I can watch it for the whole night, but…). It’s impossible to explain even a single component of Netflix, and you are asking me to design it within just 45 minutes of a short time??
Yes, this is what you are expected to do in your system design interviews if you want to get your dream job in big tech giant companies. Designing Netflix is a quite common question of system design rounds in interviews. A lot of candidates get afraid of this round more than the coding round because they don’t get the idea that what topics and trade-offs they should cover within this limited timeframe. Firstly, remember that the system design round is extremely open-ended and there’s no such thing as a standard answer. Even for the same question, you’ll have a totally different discussion with different interviewers.
In this blog, we will discuss how to design a website like Dropbox or Google Drive, but before we go further we want you to read the article “How to crack system design round in interviews?”. You’ll have an idea that what this round looks like, what you are expected to do in this round, and what mistakes you should avoid in front of the interviewer.
Netflix High-Level System Architecture
We all are familiar with Netflix services. It handles large categories of movies and television content and users pay the monthly rent to access these contents. Netflix has 180M+ subscribers in 200+ countries.
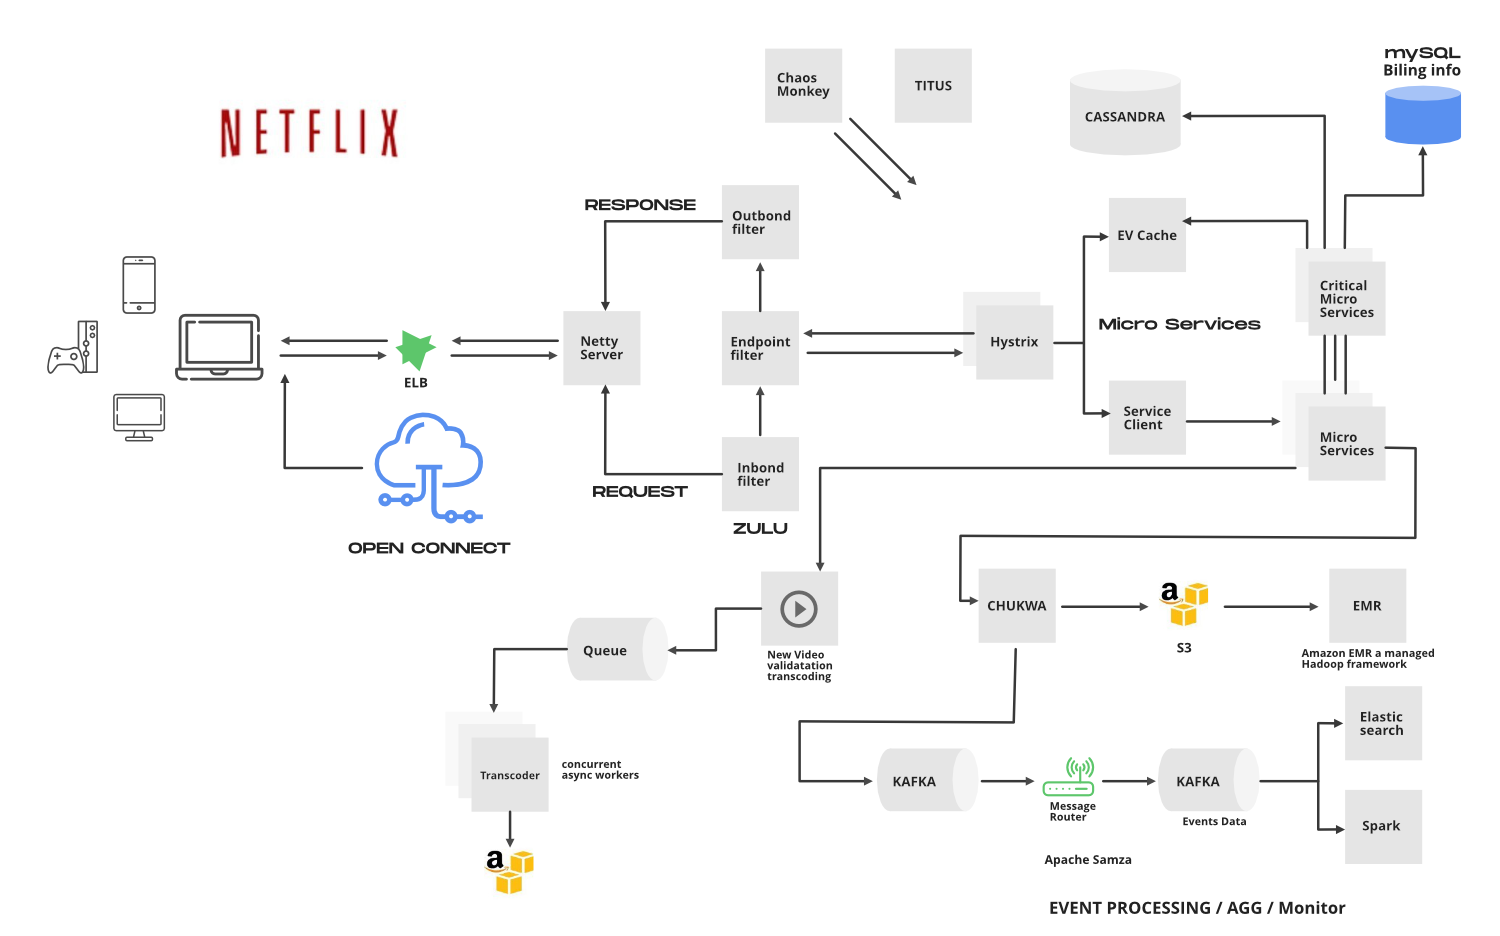
Netflix works on two clouds…AWS and Open Connect. These two clouds work together as the backbone of Netflix and both are highly responsible for providing the best video to the subscribers.
The application has mainly 3 components…
- Client: Device (User Interface) which is used to browse and play Netflix videos. TV, XBOX, laptop or mobile phone, etc
- OC (Open Connect) or Netflix CDN: CDN is the network of distributed servers in different geographical locations, and Open Connect is Netflix’s own custom global CDN (Content delivery network). It handles everything which involves video streaming. It is distributed in different locations and once you hit the play button the video stream from this component is displayed on your device. So if you’re trying to play the video sitting in North America, the video will be served from the nearest open connect (or server) instead of the original server (faster response from the nearest server).
- Backend (Database): This part handles everything that doesn’t involve video streaming (before you hit the play button) such as onboarding new content, processing videos, distributing them to servers located in different parts of the world, and managing the network traffic. Most of the processes are taken care of by Amazon Web Services.
Netflix frontend is written in ReactJS for mainly three reasons…startup speed, runtime performance, and modularity. Let’s discuss the components and working of Netflix.
How Does Netflix Onboard a Movie/Video?
Netflix receives very high-quality videos and content from the production houses, so before serving the videos to the users it does some preprocessing. Netflix supports more than 2200 devices and each one of them requires different resolutions and formats. To make the videos viewable on different devices, Netflix performs transcoding or encoding, which involves finding errors and converting the original video into different formats and resolutions.
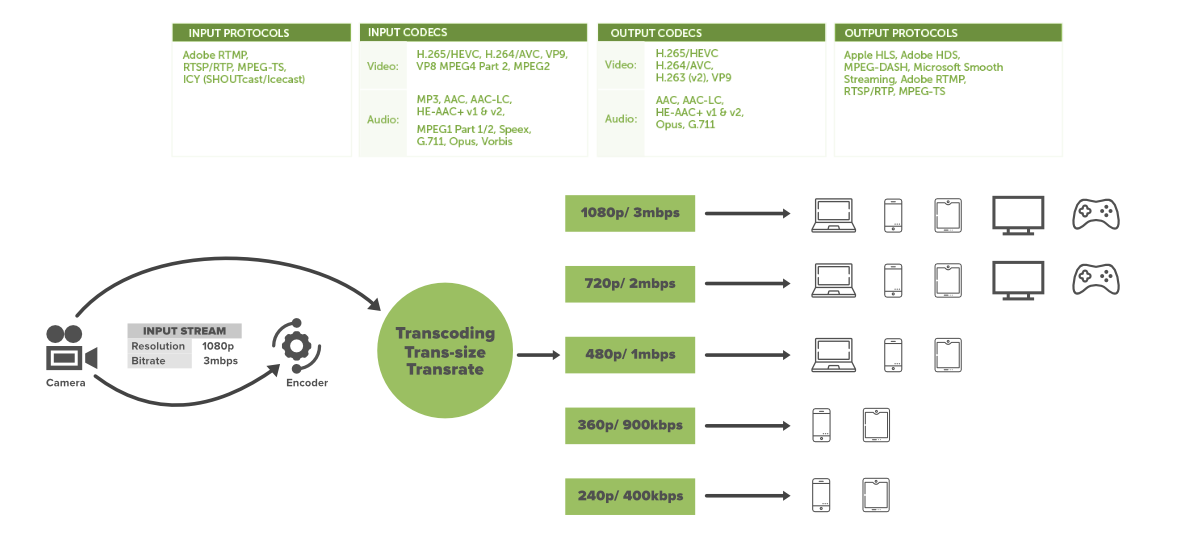
Netflix also creates file optimization for different network speeds. The quality of a video is good when you’re watching the video at high network speed. Netflix creates multiple replicas (approx 1100-1200) for the same movie with different resolutions. These replicas require a lot of transcoding and preprocessing. Netflix breaks the original video into different smaller chunks and using parallel workers in AWS it converts these chunks into different formats (like mp4, 3gp, etc) across different resolutions (like 4k, 1080p, and more).
After transcoding, once we have multiple copies of the files for the same movie, these files are transferred to each and every Open Connect server which is placed in different locations across the world.
When the user loads the Netflix app on his/her device firstly AWS instances come into the picture and handle some tasks such as login, recommendations, search, user history, the home page, billing, customer support, etc. After that, when the user hits the play button on a video, Netflix analyzes the network speed or connection stability, and then it figures out the best Open Connect server near to the user. Depending on the device and screen size, the right video format is streamed into the user’s device. While watching a video, you might have noticed that the video appears pixelated and snaps back to HD after a while. This happens because the application keeps checking the best streaming open connect server and switches between formats (for the best viewing experience) when it’s needed.
User data is saved in AWS such as searches, viewing, location, device, reviews, and likes, Netflix uses it to build the movie recommendation for users using the Machine learning model or Hadoop.
Open Connect Advantages:
- Less Expensive
- Better Quality
- More Scalable
1. Elastic Load Balancer
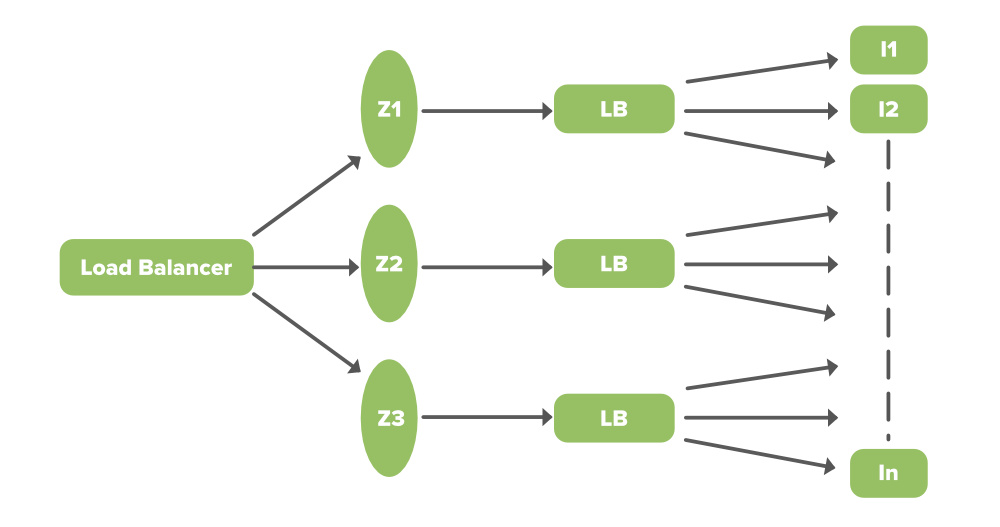
ELB in Netflix is responsible for routing the traffic to front-end services. ELB performs a two-tier load-balancing scheme where the load is balanced over zones first and then instances (servers).
- The First-tier consists of basic DNS-based Round Robin Balancing. When the request lands on the first load balancing ( see the figure), it is balanced across one of the zones (using round-robin) that your ELB is configured to use.
- The second tier is an array of load balancer instances, and it performs the Round Robin Balancing technique to distribute the request across the instances that are behind it in the same zone.
2. ZUUL
ZUUL is a gateway service that provides dynamic routing, monitoring, resiliency, and security. It provides easy routing based on query parameters, URL, and path. Let’s understand the working of its different parts…
- The Netty server takes responsibility to handle the network protocol, web server, connection management, and proxying work. When the request will hit the Netty server, it will proxy the request to the inbound filter.
- The inbound filter is responsible for authentication, routing, or decorating the request. Then it forwards the request to the endpoint filter.
- The endpoint filter is used to return a static response or to forward the request to the backend service (or origin as we call it). Once it receives the response from the backend service, it sends the request to the outbound filter.
- An outbound filter is used for zipping the content, calculating the metrics, or adding/removing custom headers. After that, the response is sent back to the Netty server and then it is received by the client.
Advantages:
- You can create some rules and share the traffic by distributing the different parts of the traffic to different servers.
- Developers can also do load testing on newly deployed clusters in some machines. They can route some existing traffic on these clusters and check how much load a specific server can bear.
- You can also test new services. When you upgrade the service and you want to check how it behaves with the real-time API requests, in that case, you can deploy the particular service on one server and you can redirect some part of the traffic to the new service to check the service in real-time.
- We can also filter the bad request by setting the custom rules at the endpoint filter or firewall.
3. Hystrix
In a complex distributed system a server may rely on the response of another server. Dependencies among these servers can create latency and the entire system may stop working if one of the servers will inevitably fail at some point. To solve this problem we can isolate the host application from these external failures. Hystrix library is designed to do this job. It helps you to control the interactions between these distributed services by adding latency tolerance and fault tolerance logic. Hystrix does this by isolating points of access between the services, remote system, and 3rd party libraries. The library helps.
- Stop cascading failures in a complex distributed system.
- control over latency and failure from dependencies accessed (typically over the network) via third-party client libraries.
- Fail fast and rapidly recover.
- Fallback and gracefully degrade when possible.
- Enable near real-time monitoring, alerting, and operational control.
- Concurrency-aware request caching. Automated batching through request collapsing
4. Microservice Architecture of Netflix
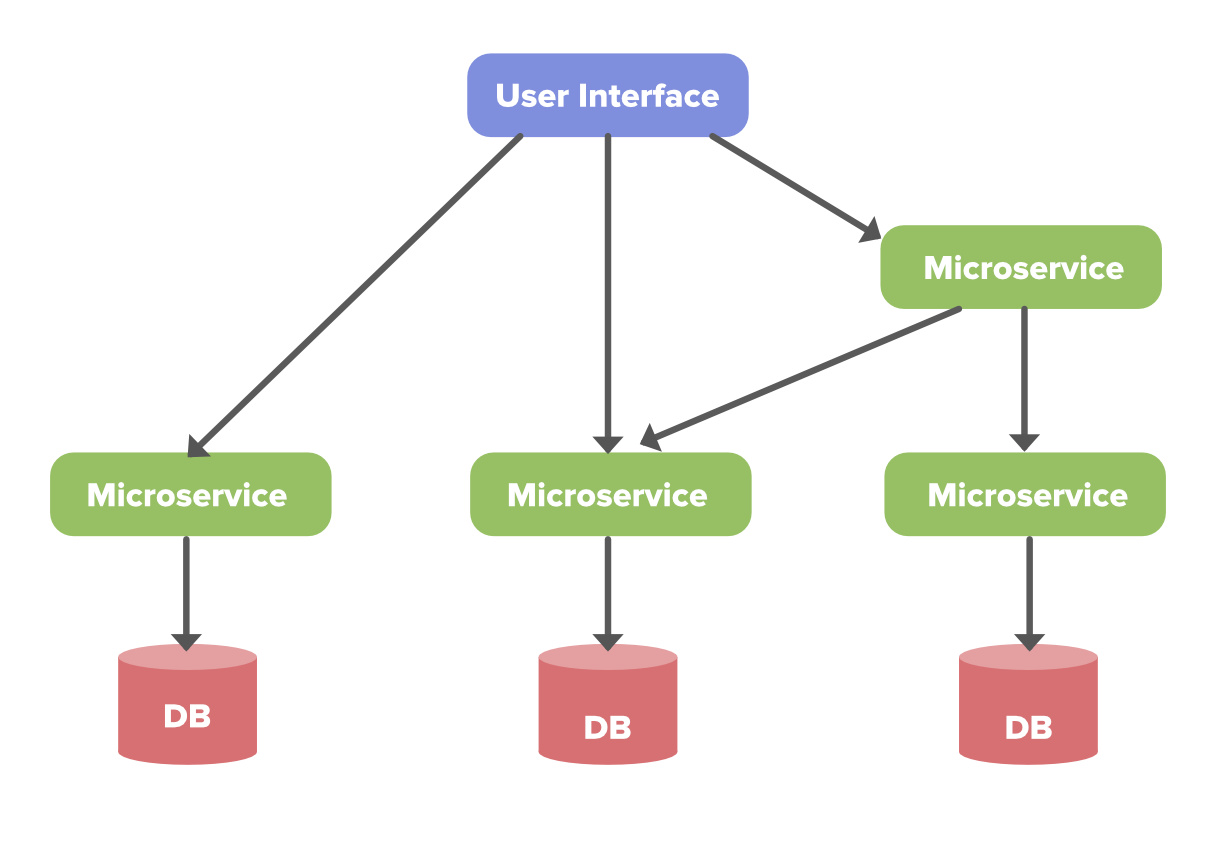
Netflix’s architectural style is built as a collection of services. This is known as microservices architecture and this power all of the APIs needed for applications and Web apps. When the request arrives at the endpoint it calls the other microservices for required data and these microservices can also request the data from different microservices. After that, a complete response for the API request is sent back to the endpoint.
In a microservice architecture, services should be independent of each other, for example, the video storage service would be decoupled from the service responsible for transcoding videos. Now, let’s understand how to make it reliable…
How to make microservice architecture reliable?
- Use Hystrix (Already explained)
- Separate Critical Microservices: We can separate out some critical services (or endpoint or APIs) and make it less dependent or independent of other services. You can also make some critical services dependent only on other reliable services. While choosing the critical microservices you can include all the basic functionalities, like searching for a video, navigating to the videos, hitting and playing the video, etc. This way you can make the endpoints highly available and even in worst-case scenarios at least a user will be able to do the basic things.
- Treat Servers as Stateless: This may sound funny to you but to understand this concept think of your servers like a herd of cows and you care about how many gallons of milk you get every day. If one day you notice that you’re getting less milk from a cow then you just need to replace that cow (producing less milk) with another cow. You don’t need to be dependent on a specific cow to get the required amount of milk.
We can relate the above example to our application. The idea is to design the service in such a way that if one of the endpoints is giving the error or if it’s not serving the request in a timely fashion then you can switch to another server and get your work done. Instead of relying on a specific server and preserving the state in that server, you can route the request to another service instance and you can automatically spin up a new node to replace it. If a server stops working, it will be replaced by another one.
5. EV Cache
In most applications, some amount of data is frequently used. For faster response, these data can be cached in so many endpoints and it can be fetched from the cache instead of the original server. This reduces the load from the original server but the problem is if the node goes down all the cache goes down and this can hit the performance of the application. To solve this problem Netflix has built its own custom caching layer called EV cache. EV cache is based on Memcached and it is actually a wrapper around Memcached.
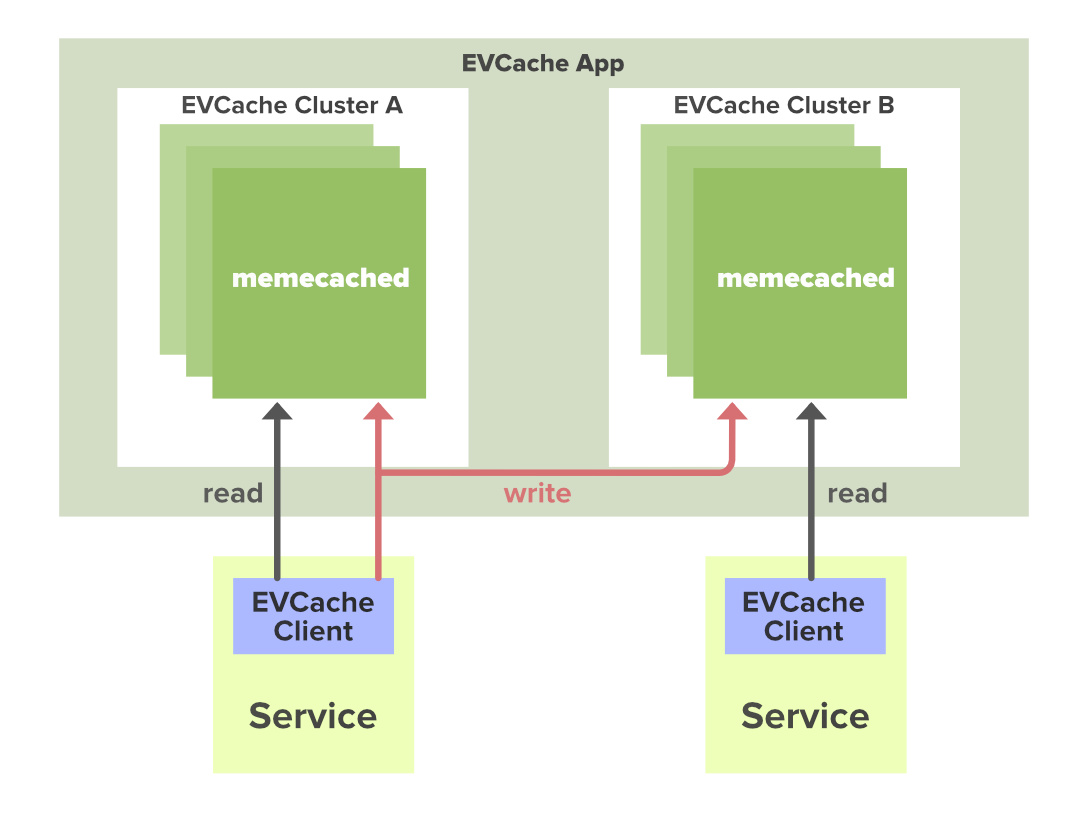
3 Node Memcached Cluster in 2 Availability Zones With a Client in Each Zone
Netflix has deployed a lot of clusters in a number of AWS EC2 instances and these clusters have so many nodes of Memcached and they also have cache clients. The data is shared across the cluster within the same zone and multiple copies of the cache are stored in sharded nodes. Every time when write happens to the client all the nodes in all the clusters are updated but when the read happens to the cache, it is only sent to the nearest cluster (not all the cluster and nodes) and its nodes. In case, a node is not available then read from a different available node. This approach increases performance, availability, and reliability.
6. Database
Netflix uses two different databases i.e. MySQL(RDBMS) and Cassandra(NoSQL) for different purposes.
EC2 Deployed MySQL
Netflix saves data like billing information, user information, and transaction information in MySQL because it needs ACID compliance. Netflix has a master-master setup for MySQL and it is deployed on Amazon’s large EC2 instances using InnoDB.
The setup follows the “Synchronous replication protocol” where if the writer happens to be the primary master node then it will be also replicated to another master node. The acknowledgment will be sent only if both the primary and remote master nodes’ write have been confirmed. This ensures the high availability of data.
Netflix has set up the read replica for each and every node (local, as well as cross-region). This ensures high availability and scalability.
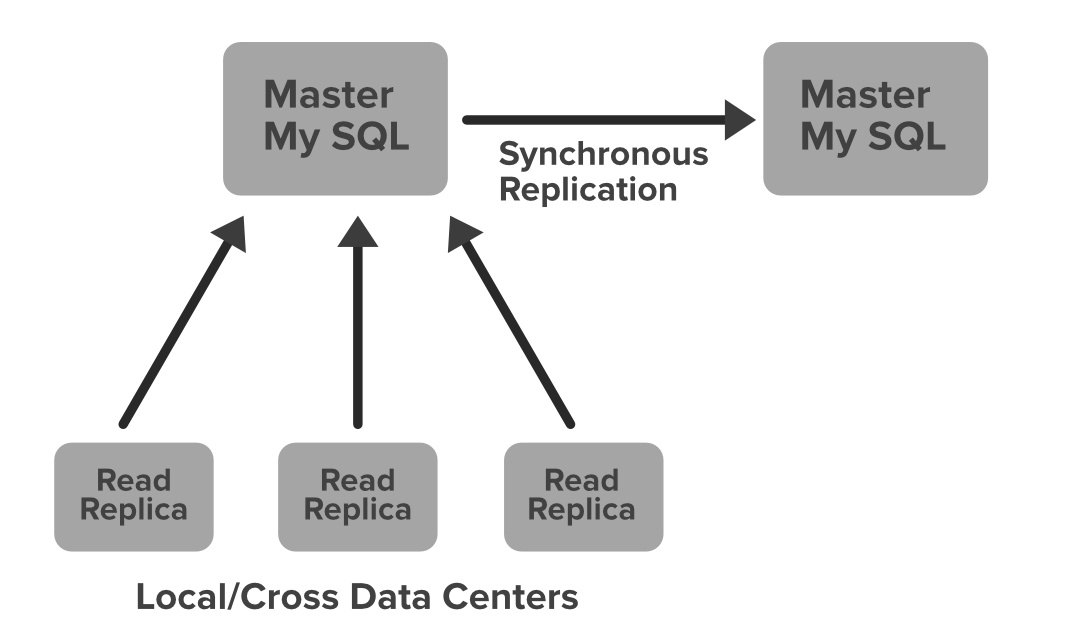
All the read queries are redirected to the read replicas and only the write queries are redirected to the master nodes. In the case of a primary master MySQL failure, the secondary master node will take over the primary role, and the route53 (DNS configuration) entry for the database will be changed to this new primary node. This will also redirect the write queries to this new primary master node.
Cassandra
Cassandra is a NoSQL database that can handle large amounts of data and it can also handle heavy writing and reading. When Netflix started acquiring more users, the viewing history data for each member also started increasing. This increases the total number of viewing history data and it becomes challenging for Netflix to handle this massive amount of data. Netflix scaled the storage of viewing history data-keeping two main goals in their mind…
- Smaller Storage Footprint.
- Consistent Read/Write Performance as viewing per member grows (viewing history data write-to-read ratio is about 9:1 in Cassandra).
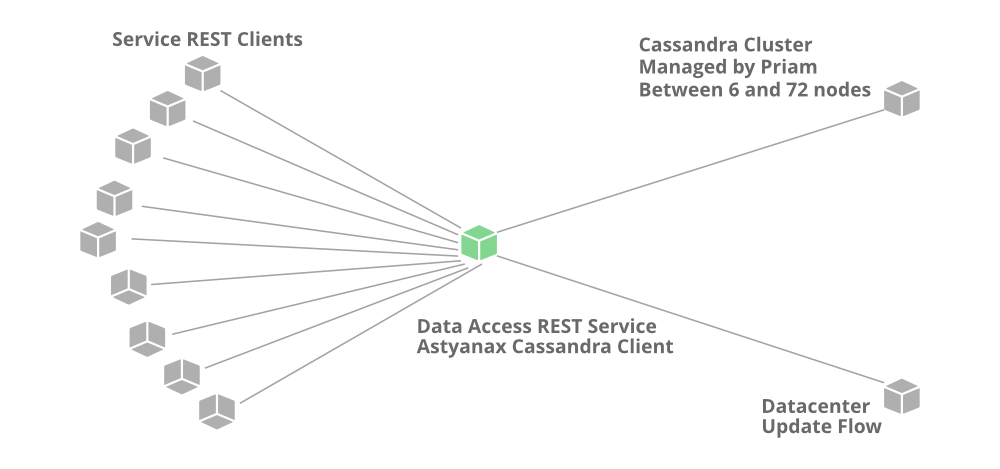
Total Denormalized Data Model
- Over 50 Cassandra Clusters
- Over 500 Nodes
- Over 30TB of daily backups
- The biggest cluster has 72 nodes.
- 1 cluster over 250K writes/s
Initially, the viewing history was stored in Cassandra in a single row. When the number of users started increasing on Netflix the row sizes as well as the overall data size increased. This resulted in high storage, more operational cost, and slow performance of the application. The solution to this problem was to compress the old rows…
Netflix divided the data into two parts…
- Live Viewing History (LiveVH): This section included the small number of recent viewing historical data of users with frequent updates. The data is frequently used for the ETL jobs and stored in uncompressed form.
- Compressed Viewing History (CompressedVH): A large amount of older viewing records with rare updates is categorized in this section. The data is stored in a single column per row key, also in compressed form to reduce the storage footprint.
7. Data Processing in Netflix Using Kafka And Apache Chukwa
When you click on a video Netflix starts processing data in various terms and it takes less than a nanosecond. Let’s discuss how the evolution pipeline works on Netflix.
Netflix uses Kafka and Apache Chukwe to ingest the data which is produced in a different part of the system. Netflix provides almost 500B data events that consume 1.3 PB/day and 8 million events that consume 24 GB/Second during peak time. These events include information like…
- Error logs
- UI activities
- Performance events
- Video viewing activities
- Troubleshooting and diagnostic events.
Apache Chukwe is an open-source data collection system for collecting logs or events from a distributed system. It is built on top of HDFS and Map-reduce framework. It comes with Hadoop’s scalability and robustness features. Also, it includes a lot of powerful and flexible toolkits to display, monitor, and analyze the result. Chukwe collects the events from different parts of the system and from Chukwe you can do monitoring and analysis or you can use the dashboard to view the events. Chukwe writes the event in the Hadoop file sequence format (S3). After that Big Data team processes these S3 Hadoop files and writes Hive in Parquet data format. This process is called batch processing which basically scans the whole data at the hourly or daily frequency.
To upload online events to EMR/S3, Chukwa also provide traffic to Kafka (the main gate in real-time data processing). Kafka is responsible for moving data from fronting Kafka to various sinks: S3, Elasticsearch, and secondary Kafka. Routing of these messages is done using the Apache Samja framework. Traffic sent by the Chukwe can be full or filtered streams so sometimes you may have to apply further filtering on the Kafka streams. That is the reason we consider the router to take from one Kafka topic to a different Kafka topic.
8. Elastic Search
In recent years we have seen massive growth in using Elasticsearch within Netflix. Netflix is running approximately 150 clusters of elastic search and 3, 500 hosts with instances.
Netflix is using elastic search for data visualization, customer support, and for some error detection in the system. For example, if a customer is unable to play the video then the customer care executive will resolve this issue using elastic search. The playback team goes to the elastic search and searches for the user to know why the video is not playing on the user’s device. They get to know all the information and events happening for that particular user. They get to know what caused the error in the video stream. Elastic search is also used by the admin to keep track of some information. It is also used to keep track of resource usage and to detect signup or login problems.
9. Apache Spark For Movie Recommendation
Netflix uses Apache Spark and Machine learning for Movie recommendations. Let’s understand how it works with an example. When you load the front page you see multiple rows of different kinds of movies. Netflix personalizes this data and decides what kind of rows or what kind of movies should be displayed to a specific user. This data is based on the user’s historical data and preferences. Also, for that specific user, Netflix performs sorting of the movies and calculates the relevance ranking (for the recommendation) of these movies available on their platform.
In Netflix, Apache Spark is used for content recommendations and personalization. A majority of the machine learning pipelines are run on these large spark clusters. These pipelines are then used to do row selection, sorting, title relevance ranking, and artwork personalization among others.
Artwork Personalization
When you open the Netflix front page you might have noticed the images for each video…these images are called header images (thumbnails). Netflix wants maximum clicks for the videos from the users and these clicks are dependent on the header images. Netflix has to choose the right compelling header image for a specific video. To do that Netflix creates multiple artworks for a specific movie and they display these images to the users randomly. For the same movie, images can be different for different users. Based on your preferences and viewing history Netflix predicts what kind of movies you like best or which actors you like the most in a movie. According to users’ tastes, the images will be displayed to them.
For example, suppose you see 9 different images for your favorite movie Good will hunting in three rows (If you like comedies then images of Robin Williams for this movie will be shown. If you like romantic movies then Netflix will show you the image of Matt Damon and Minnie Driver). Now, Netflix calculates the number of clicks a certain image receives. If the clicks for the center image of the movie are 1, 500 times and the other images have fewer clicks then Netflix will make the center image a header image for the movie Good Will Hunting forever. This is called data-driven and Netflix performs the data analytics with this approach. To make the right decision data is calculated based on the number of views associated with each picture.
Video Recommendation System
If a user wants to discover some content or video on Netflix, the recommendation system of Netflix helps users to find their favorite movies or videos. To build this recommendation system Netflix has to predict the user interest and it gathers different kinds of data from the users such as…
- User interaction with the service (viewing history and how the user rated other titles)
- Other members with similar tastes and preferences.
- Metadata information from the previously watched videos for a user such as titles, genre, categories, actors, release year, etc.
- The device of the user, at what time a user is more active, and for how long a user is active.
Netflix uses two different algorithms to build a recommendation system…
1. Collaborative filtering: The idea of this filtering is that if two users have similar rating histories then they will behave similarly in the future. For example, consider there are two-person. One person liked the movie and rated the movie with a good score. Now, there is a good chance that the other person will also have a similar pattern and he/she will do the same thing that the first person has done.
2. Content-based filtering: The idea is to filter those videos which are similar to the video a user has liked before. Content-based filtering is highly dependent on the information from the products such as movie title, release year, actors, the genre. So to implement this filtering it’s important to know the information describing each item and some sort of user profile describing what the user likes is also desirable.
Want to get a Software Developer/Engineer job at a leading tech company? or Want to make a smooth transition from SDE I to SDE II or Senior Developer profiles? If yes, then you’re required to dive deep into the System Design world! A decent command over System Design concepts is very much essential, especially for working professionals, to get a much-needed advantage over others during tech interviews.
And that’s why, GeeksforGeeks is providing you with an in-depth interview-centric Mastering System Design Course that will help you prepare for the questions related to System Designs for Google, Amazon, Adobe, Uber, and other product-based companies.


