This articles describes how we can secure an Azure Function API by an authentication token. Azure functions provide great features such as extensive choice of languages for development, integration with other SaaS offerings, integrated security with many OAuth Providers etc.
I will give step by step detailed demonstration by creating a Azure Function app from scratch and configuring/coding to secure the Azure Function API.
- In your azure portal, go to All Resources > New > Server-less Function app as shown below :

2. Provide the required details such as App Name, Hosting plan, Subscription, OS, Resource group, Location, Runtime stack and Storage account. Please note that this may vary depending on your choices and subscription.

3. Click on create to provision the Function App for you. This may take some time to provision.
Once created you can go the newly create Function App from All Resources in the menu.

Please make sure the status is running and navigate to the highlighted box URL in browser to make sure your app is running.

4. Next, click on the “Get publish profile” (see below) link and download the file and save it on your disk.

5. Next Open Visual Studio, create a new project using the template shown below:

Before creation it would ask to select the Azure Function type i.e v1 or v2. Additional Triggers to choose, access rights & Storage account. For this example I have selected v1 with Http Trigger, Access right as Anonymous & Storage account as Storage Emulator as shown below:

6. Above steps created a Azure function shown below, I have renamed this function as “Sample”.

7. Hit F5 and your AzureFunctionsTools will appear, this would show the local URL & port where newly created Azure function is running. We can check this URL in our browser or postman and also can debug locally in VS.

8. Open you postman tool, run the function by creation a Post request as shown below to make sure our newly created function is running fine without any error. As per the code I am passing “Atishubh” my name in the request body as “name” property value & I can see the output as per the code.

9. Next , we can publish the same to Azure by clicking on “Import profile” & selecting the file in Step 4. Click on Publish to publish the Azure function in Azure . This will create a new function in our Azure App created in Step 2 and will make our new function available publicly.

10. In Postman, replace localhost host with Azure App URL mentioned in step 3 and verify its running fine as below:

11. At this point, we have our function publicly available without any security restrictions, however in real life scenarios it would make more sense if this is secure, We will secure this with Azure AD Identity provider in next steps .
12. From Azure Active Directory > App registration click on New registration to create a new Azure AD app

13. Provide a name & the account types as per your need & click on “Register”.

14. Once created you will see the newly created app similar to below :

Please make note of Application Client ID, next we need to generate a Client secret, next on the same page left menu click on “Certificates & secrets”. Generate a New client secret by clicking on the button “New Client Secret” & providing key name. Please note down the secret in a secured location for future reference.

15. Navigate to “API Permissions” in the left hand menu & click on “Grant admin consent” button.

16. Next click on “Authentication” in the left menu, and enable “Access token” & “Id token” checkbox as shown below , Redirect Uri we will fill in forthcoming steps . Click on “Save” to finish the registration.

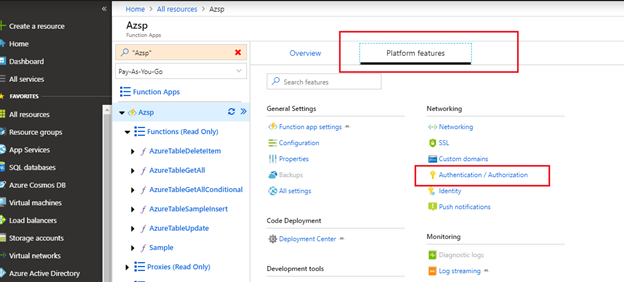
17. In Azure portal, navigate to our Function App, click on “Platform features” > “Authentication/Authorization” as below :

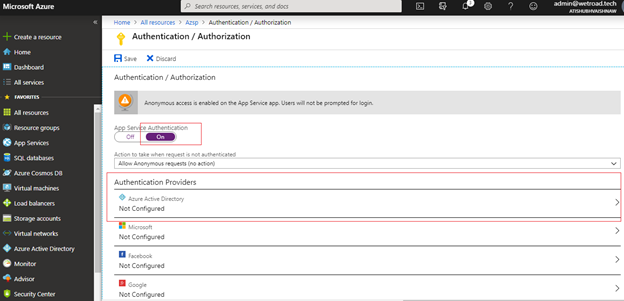
18. Enable App Service authentication & select Azure Active Directory under Authentication Providers as below :

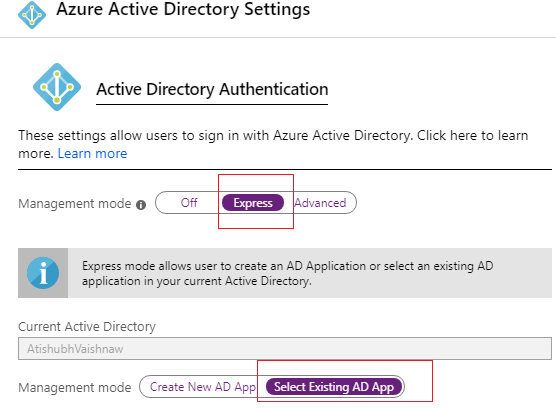
19. Select the Express management mode and click on “Select Existing AD app”.

20. Select our newly created “SampleADApp” created in previous steps & click on ok.

21. Before clicking Save, under “Action to take when request is not authenticated” select “Log in with Azure Active Directory” & click on Save.

22. As we have now configured our Function App to be authenticated by Azure AD , same request in Postman will not give desired output & instead will return redirect page (as shown below)

23. Next in VS, open local.settings.json file and create key value pairs as shown below :

SampleADAppClientId is the client id of your Azure AD OAuth app which we noted in Step 14, SampleADAppClientSecert is the client secret we generated in Step 14, SampleADAppRedirecturi is the URI of the authentication function we will create in step 25, please note we need to change the localhost to your Azure Function app URL in production environment before publish. For debugging we are keeping it as localhost for now. SampleADAppAuthEndPoint is default login endpoint for Azure AD.
24. Next in Azure portal, go back to your Azure AD registered app & configure the Redirect URI as shown below, after successful authentication from our AAD login page, AAD identity provider will redirect to our authentication function which we create in next step.

25. Next create a new HttpTrigger function in the same project in VS. I have named it as AuthTokenGenerator. This function will receive authorization code from AAD identity provider after successful authentication. The below code generates access token based on that authorization code. Once it generates access token it creates another POST request to default login endpoint for Azure AD by passing access token in request body & receives authenticationToken . The implementation code is as below:

26. Publish the newly created function API to Azure, so that it becomes available publicly. Next we create a sample Login.html file to invoke our login functionality, below is a sample I created for reference..

Please note on login button click I am invoking AAD login by below code, after successful authentication this returns me the authorization code, which I pass as a parameter to our AuthTokenGenerator function. Here is the URL I use for invoking.
window.open(‘https://login.microsoftonline.com/vaishnaw.onmicrosoft.com/oauth2/authorize?client_id=53a9a189-123e-4490-9f06-7b2a6f191b68&response_type=code&redirect_uri=http://localhost:7071/api/AuthTokenGenerator&scope=openid&state=12345&nonce=7362CAEA-9CA5-4B43-9BA3-34D7C303EBA', null, ‘width=600,height=400’)
Replace the client id with your Azure AD app client id, for debugging locally I have used redirect_uri as localhost with my locally running port . Next run your Login.html in browser as below & click on AZURE AD LOGIN button.

This will launch the login page, login with your AAD credentials . Meanwhile also run your Azure Function locally and create a debug point as shown below. After successful login , once this break-point hits as explained in previous step it provides the authentication token.


27. Copy the token & lets go back to our POST request in postman tool described is Step 22, This time add a header “X-ZUMO-AUTH” with the request and value as the authentication token acquired in previous step. You will see this time the request is successful & gives desired output as shown below. Happy Coding!


No comments:
Post a Comment