Thursday, April 21, 2022

Clean code architecture and CQRS pattern based web api using .NetCore

 Interesting thing about this article is bring ing mediaR pattern into clean architecutre which can support CQRS or command and Query much effectively at the same time manage required layers supported by Cleanr architecutre. 

Easy and useful Pattern to make code clean and  structure. 


Clean Code Architecture

Clean Code Architecture or often called Onion Architecture is a layered architecture that makes your project easy to manage and test.
You can find the common pictures of this concept from visual diagram below.
Alt Text
If you don't know about clean code architecture, there are some useful links you can visit.

CQRS and the Mediator Pattern

CQRS

CQRS stands for “Command Query Responsibility Segregation”. The main purpose of this pattern is to split responsibility of commands (saves) and queries (reads) into different models.

If we think about commonly used CRUD pattern, we think it as working on same data model to perform CRUD operations. For an example if we have a user model class, we usually performs the CRUD operations on that user model class. However CQRS would instead have us split these operations into two models, one for the queries (Read), and another for the commands (Create-Update-Delete).

Alt Text

Mediator pattern

Mediator pattern is used to reduce communication complexity between multiple objects or classes. This pattern provides a mediator class which normally handles all the communications between different classes and supports easy maintenance of the code by loose coupling.

Alt Text


We can see in the image above, Controller Service sends a message to the Mediator, the Mediator then invokes one or multiple services to handle the message. There is no direct dependency between green and blue components.


MediatR library for CQRS and Mediator pattern


MediatR is a .Net library that is used to implement CQRS with mediator pattern. However this library has a limitation. It only works on 'in process' CQRS implementation. The term 'in process' means .NET library that manages interactions within classes on the same process. It is not an appropriate library to use if we wanted to separate the commands and queries across two systems. In that case, a better approach would be to a message broker such as Kafka or RabbitMq.

Setting up project

Project Setup

First off, let’s open Visual Studio and create a new ASP.NET Core Web Application, selecting API as the project type.

Project Dependencies

Let’s install a couple of packages via the Package Manager Console.
PM> install-package MediatR
PM> install-package MediatR.Extensions.Microsoft.DependencyInjection
PM> install-package FluentValidation.AspNetCore
PM> install-package FluentValidation.DependencyInjectionExtensions
PM> install-package Microsoft.AspNetCore.Mvc.Versioning
PM> install-package MongoDB.Driver
PM> install-package Swashbuckle.AspNetCore.Swagger
PM> install-package Swashbuckle.AspNetCore.SwaggerGen
PM> install-package Swashbuckle.AspNetCore.SwaggerUI
PM> install-package System.Linq.Dynamic.Core
PM> install-package AutoMapper
PM> install-package AutoMapper.Extensions.Microsoft.DependencyInjection
PM> install-package Autofac
PM> install-package Autofac.Extensions.DependencyInjection

You can find GitHub link here

Sunday, April 10, 2022

Clean Architecture With .NET 6


Software design and architecture, generally refer to the foundation, structure, and organization of the solution. While designing a sustainable solution, we should always consider maintainability at the top. Maintainability means the solution should be well architected with a strong base. The solution should follow the best principles and design practices.

Clean architecture is one of the most used software development design patterns because of its sustainable characteristics.

In this article, I will brief on what a clean architecture is and design a solution in .NET 6 following this architecture. 

  • Brief about Clean Architecture
  • Design a clean architecture solution with .NET 6
  • ASP.NET Core Web API using Clean architecture
  • Implementing Entity framework in clean architecture with .NET 6

We can use the same approach to design clean architecture with ASP.NET core MVC, ASP.NET Core Razor Pages, web API or Win Forms.

Clean Architecture

Clean Architecture which is also known as Domain-Driven Design has evolved with considerable improvements in the last several years. Some of the architecture names used for clean architecture over the years are given below:

Above mentioned architectures have similar design principles that have the primary idea to keep the core business login and application domain at the center of the solution structure.

Therefore, the whole idea of this architecture is to allow the core part, which consists of complete business logic and application entities, adaptive and flexible enough to deal with changing technology and interfaces. Additionally, the core application remains the same and independent of presentation layers, infrastructures, and databases.

In these fast-paced technologies, JavaScript frameworks, web framework, database and external parts become absolute or upgraded, using this clean architecture you can replace these items with minimum effort. This architecture saves huge time because the core application business logic and entity are independent of framework, presentations, databases, and external parts. Subsequently, the architecture is sustainable and is loosely coupled core business logic and entity with presentation layer or framework.

Let’s start with solution design.

Prerequisites

  • .NET 6 SDK (https://dotnet.microsoft.com/download/dotnet/6.0)
  • Visual Studio 2022 or Visual Studio Code

Implementing Clean Architecture with .NET 6

In this section, we will have a complete solution following the principles of Clean Architecture in .NET 6.

To commence, let’s create a blank solution in Visual Studio. We will open Visual Studio and choose the project template as Blank Solution as shown below.

We will give a name to the solution. I will use a dummy name as “RijsatCleanArchtecture” for this article, however, we always give a proper name based on the project. Subsequently, we will provide the location of the solution.

We will add core parts of the solution: Core logic and Entity (Model). Let’s add class libraries for those by right click on the solution and add the project as shown below.

Select the class library template. You can simply search it by typing words as shown.

We will name the class library.

Next screen will give the option to choose the framework. We will select .NET 6.

Similarly, we will create Application and Infrastructure libraries and organize the project as portrayed below.

Let me explain a bit more about the above organization of the libraries. We are grouping the core part of the solution that contains Domain and Application. These two libraries are independent of external Databases, Services, and presentation (UI). Similarly, we can keep all the external agents like infrastructure, Persistence, Drivers, Services into a separate folder Infra.

Now we will create a host project. We can again group host projects together. Host projects are generally presentation layers that contain WebApi, ASP.NET MVC, Razor Pages or Separate UI with Frontend Framework.

For this article, I will be using ASP.NET Core Web API as host or UI. Let’s create the host project in the solution.

We will provide a name for the Web API, and then we will get a few more options as shown.

There are options to choose framework, Authentication type, Https configuration, Docker Enable, Use controllers, OpenAPI support. You can choose the option based on needs.

However, we can add ASP.NET MVC or Razor Pages as a presentation UI based on our requirement. Importantly, the core (Business logic) and infrastructure part will be the same as the basic principle of clean architecture. 

Now, the solution will be organized as shown.

Now, we will add project dependencies. As per clean architecture principles, we keep the domain intact, which means there will be not any project reference or external package in this domain library. Next layer, application (business logic) will refer only to a domain library and use packages as tools only. 

Both UI and infrastructure will add an application library as reference. 

The project references will be as shown below.

  • There will be not any reference to Domain Library
  • Application: Add reference of Domain project
  • Infrastructure: Add reference of application project
  • WebApi: Add reference of application and Infrastructure projects

If you observe the above solution, the core business logic (Domain + Application) is independent of UI, database, external agent, and Infrastructure. However, UI and Infrastructure are dependent on core business logic. Therefore, if we change the UI, database or external services, the core part (Domain and Application) will remain the same, which makes the solution sustainable and maintainable in the long run.

Now, our solution is ready with clean architecture in .NET 6.

This article is a part of Clean Architecture with .NET 6 where I have designed a solution using the principles. In the next article, I will implement Entity Framework with the same solution.

Conclusion

To sum up, this article has explained what clean architecture is and design principles. Additionally, I have designed a clean architecture with .NET 6. I have also created ASP.NET Core Web API using the clean architecture standards. In the next article, I will implement entity framework in clean architecture with .NET 6 and do a CRUD operation.

Thursday, January 27, 2022

How to Build an Event-Driven ASP.NET Core Microservice Architecture with RabbitMQ and Entity Framework

 Summary: very good article to learn 

1. implenting microservices 

2. using rabbitmq to send messages to service 


How to Build an Event-Driven ASP.NET Core Microservice Architecture with RabbitMQ and Entity Framework

Use RabbitMQ, C#, REST-API and Entity Framework for asynchronous decoupled communication and eventually consistency with integration events and publish-subscribe

In this guide, you will create two C# ASP.NET Core Microservices. Both microservices have their own bounded context and domain model. Each microservice has its own database and REST API. One microservice publishes integration events, that the other microservice consumes.

Decoupled Microservices — A Real-World Example With Code

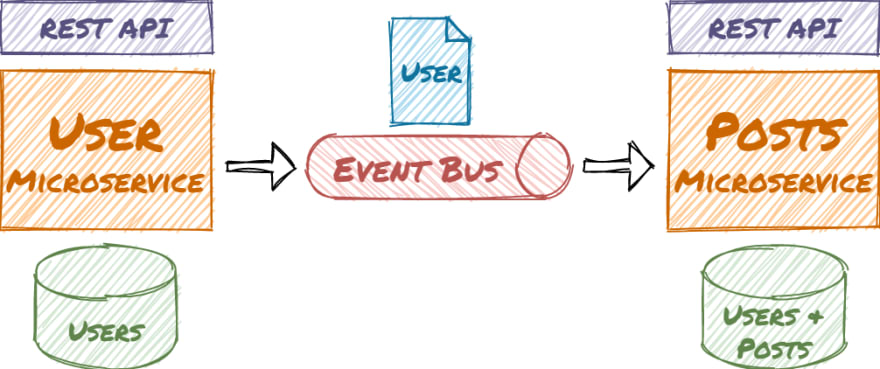
The application uses a real-world example with users that can write posts. The user microservice allows creating and editing users. In the user domain, the user entity has several properties like name, mail, etc. In the post domain, there is also a user so the post microservice can load posts and display the writers without accessing the user microservice. The user entity in the post domain is much simpler:

The microservices are decoupled and the asynchronous communication leads to eventual consistency. This kind of architecture is the basis for loosely coupled services and supports high scalability. The microservices access their example Sqlite databases via Entity Framework and exchange messages via RabbitMQ (e.g. on Docker Desktop).

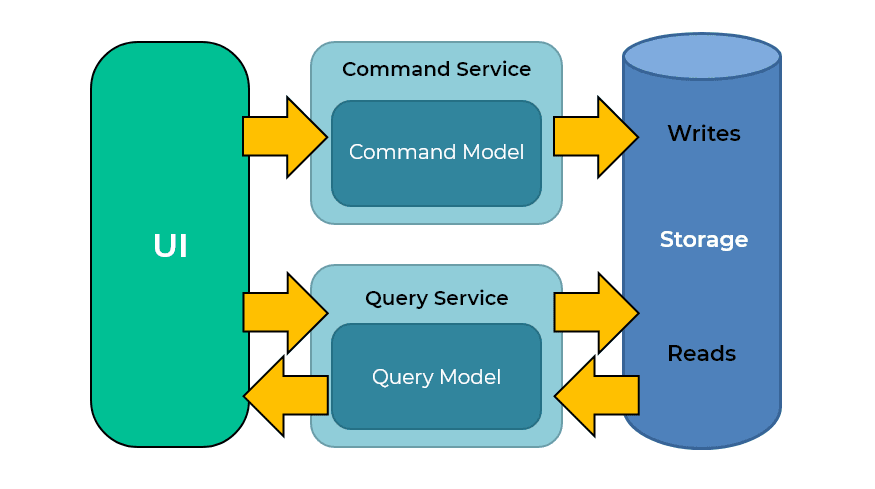
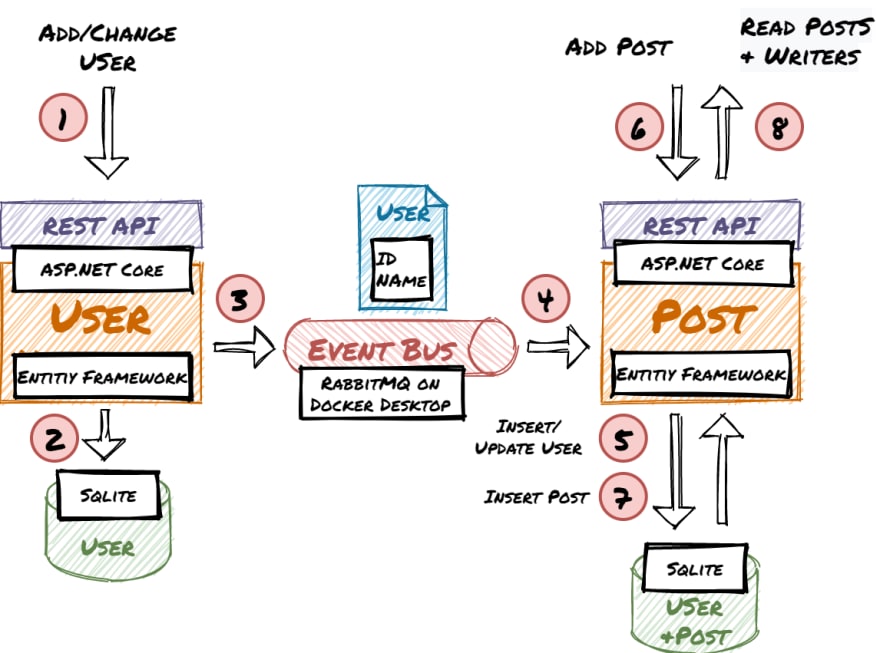
Overview diagram of the workflow, components, and technologies:

The code and configurations in this article are not suitable for production use. This guide focuses on the concepts and how the components interact. For this purpose error handling, etc. is omitted.

Steps of this Guide

  1. Create the .NET Core Microservices

  2. Use RabbitMQ and Configure Exchanges and Pipelines

  3. Publish and Consume Integration Events in the Microservices

  4. Test the Workflow

  5. Final Thoughts and Outlook


1. Create the .NET Core Microservices

In the first part of this guide, you will create the User and Post Microservice. You will add the Entities and basic Web APIs. The entities will be stored and retrieved via Entity Framework from Sqlite DBs. Optionally you can test the User Microservice with the Swagger UI in the browser.

Let’s get started.

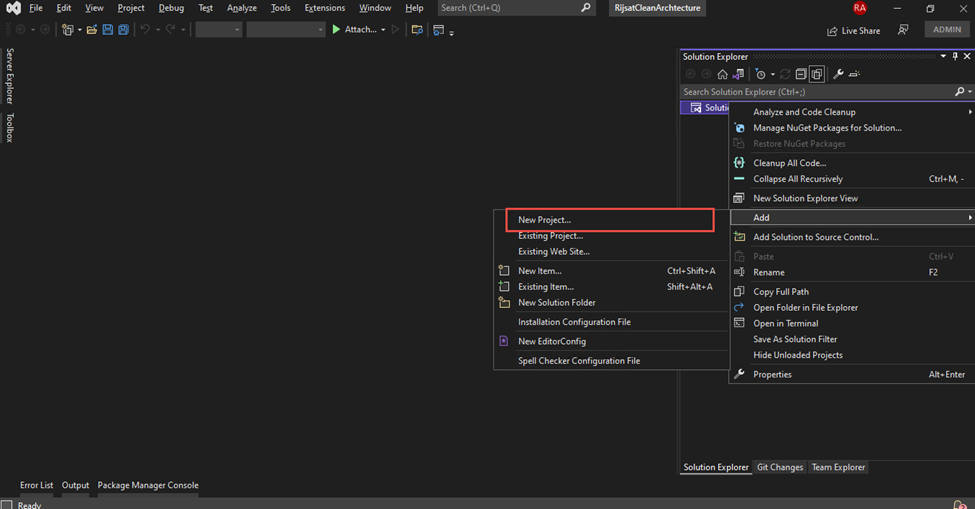
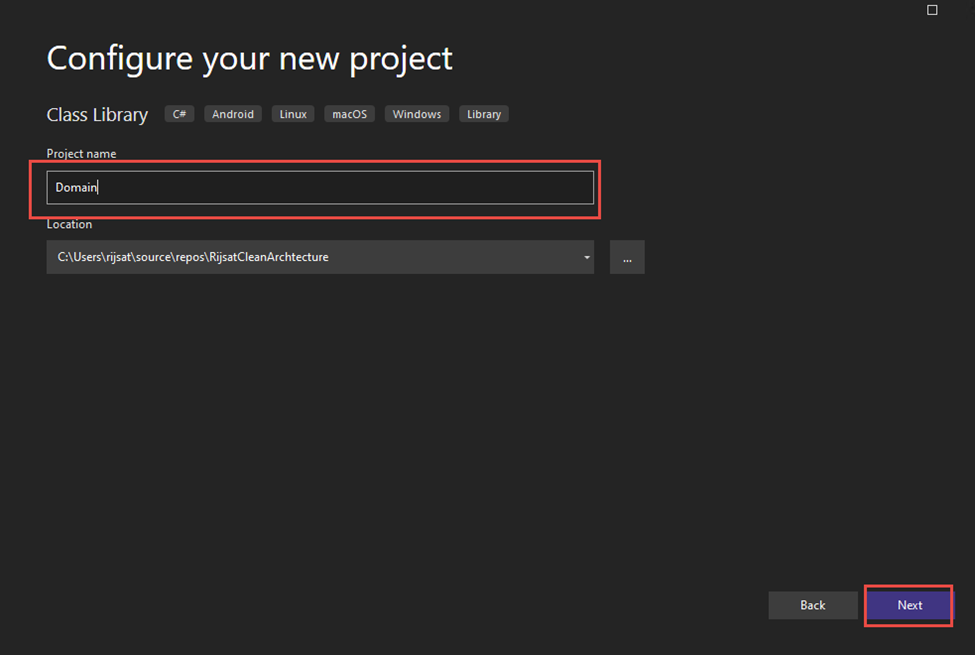
Install Visual Studio Community (it’s free) with the ASP.NET and web development workload.

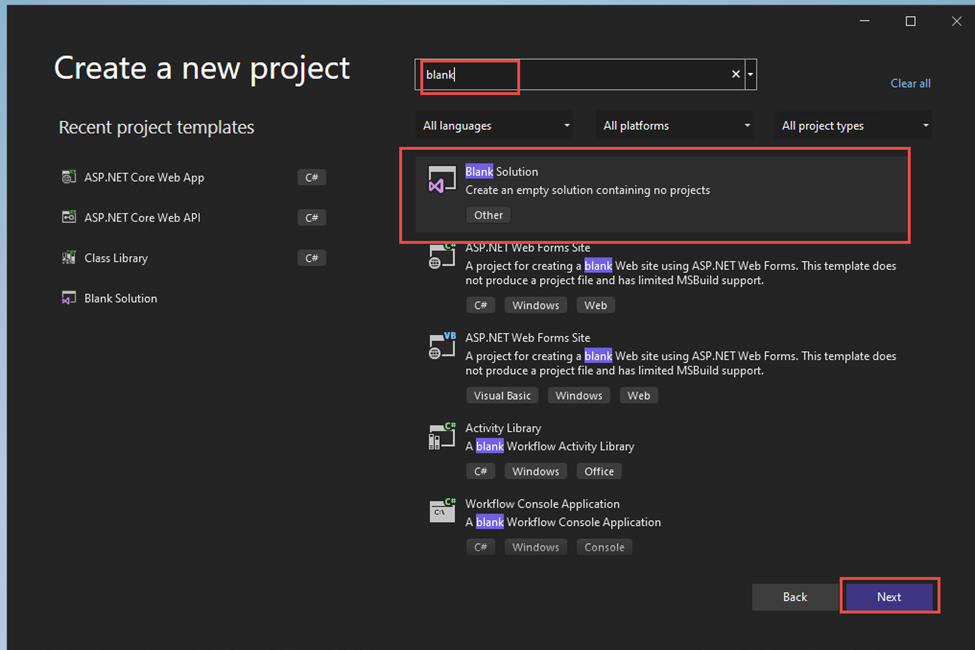
Create a solution and add the two ASP.NET Core 5 Web API projects “UserService” and “PostService”. Disable HTTPS and activate OpenAPI Support.

For both projects install the following NuGet packages:

  • Microsoft.EntityFrameworkCore.Tools

  • Microsoft.EntityFrameworkCore.Sqlite

  • RabbitMQ.Client

Implement the UserService

Create the User Entity:

namespace UserService.Entities
{
public class User
{
public int ID { get; set; }
public string Name { get; set; }
public string Mail { get; set; }
public string OtherData { get; set; }
}
}
view rawUser.cs hosted with ❤ by GitHub

Create the UserServiceContext:

using Microsoft.EntityFrameworkCore;
namespace UserService.Data
{
public class UserServiceContext : DbContext
{
public UserServiceContext (DbContextOptions<UserServiceContext> options)
: base(options)
{
}
public DbSet<UserService.Entities.User> User { get; set; }
}
}

Edit Startup.cs to configure the UserServiceContext to use Sqlite and call Database.EnsureCreated() to make sure the database contains the entity schema:

public void ConfigureServices(IServiceCollection services)
{
services.AddControllers();
services.AddSwaggerGen(c =>
{
c.SwaggerDoc("v1", new OpenApiInfo { Title = "UserService", Version = "v1" });
});
services.AddDbContext<UserServiceContext>(options =>
options.UseSqlite(@"Data Source=user.db"));
}
public void Configure(IApplicationBuilder app, IWebHostEnvironment env, UserServiceContext dbContext)
{
if (env.IsDevelopment())
{
dbContext.Database.EnsureCreated();
...
view rawStartup.cs hosted with ❤ by GitHub

Create the UserController (It implements only the methods necessary for this demo):

using Microsoft.AspNetCore.Mvc;
using Microsoft.EntityFrameworkCore;
using System.Collections.Generic;
using System.Threading.Tasks;
using UserService.Data;
using UserService.Entities;
namespace UserService.Controllers
{
[Route("api/[controller]")]
[ApiController]
public class UsersController : ControllerBase
{
private readonly UserServiceContext _context;
public UsersController(UserServiceContext context)
{
_context = context;
}
[HttpGet]
public async Task<ActionResult<IEnumerable<User>>> GetUser()
{
return await _context.User.ToListAsync();
}
[HttpPut("{id}")]
public async Task<IActionResult> PutUser(int id, User user)
{
_context.Entry(user).State = EntityState.Modified;
await _context.SaveChangesAsync();
return NoContent();
}
[HttpPost]
public async Task<ActionResult<User>> PostUser(User user)
{
_context.User.Add(user);
await _context.SaveChangesAsync();
return CreatedAtAction("GetUser", new { id = user.ID }, user);
}
}
}

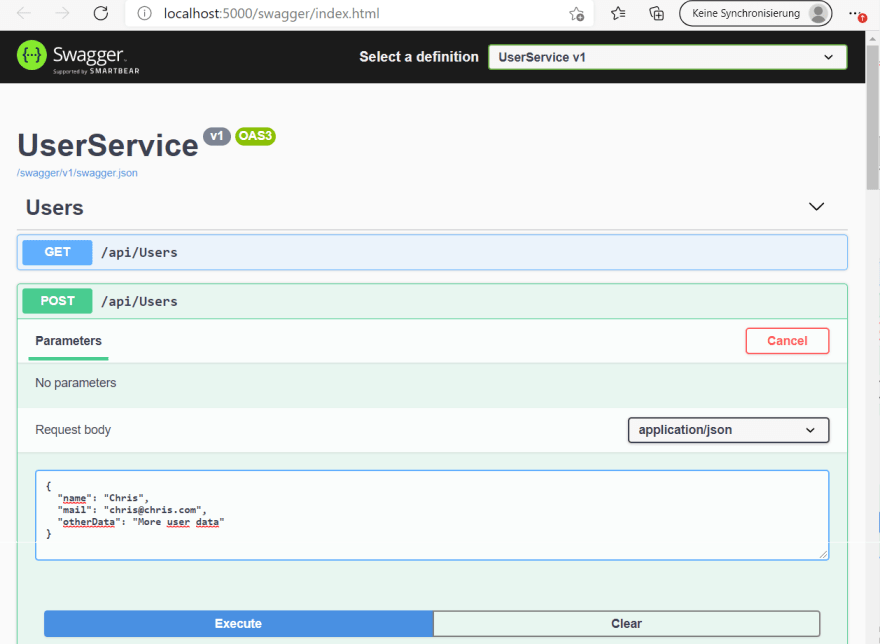
Debug the UserService project and it will start your browser. You can use the swagger UI to test if creating and reading users is working:

Implement the PostService

Create the User and Post entities:

namespace PostService.Entities
{
public class User
{
public int ID { get; set; }
public string Name { get; set; }
}
}
view rawUser.cs hosted with ❤ by GitHub
namespace PostService.Entities
{
public class Post
{
public int PostId { get; set; }
public string Title { get; set; }
public string Content { get; set; }
public int UserId { get; set; }
public User User { get; set; }
}
}
view rawPost.cs hosted with ❤ by GitHub

Create the PostServiceContext:

using Microsoft.EntityFrameworkCore;
namespace PostService.Data
{
public class PostServiceContext : DbContext
{
public PostServiceContext (DbContextOptions<PostServiceContext> options)
: base(options)
{
}
public DbSet<PostService.Entities.Post> Post { get; set; }
public DbSet<PostService.Entities.User> User { get; set; }
}
}

Edit startup.cs to configure the UserServiceContext to use Sqlite and call Database.EnsureCreated() to make sure the database contains the entity schema:

public void ConfigureServices(IServiceCollection services)
{
services.AddControllers();
services.AddSwaggerGen(c =>
{
c.SwaggerDoc("v1", new OpenApiInfo { Title = "PostService", Version = "v1" });
});
services.AddDbContext<PostServiceContext>(options =>
options.UseSqlite(@"Data Source=post.db"));
}
public void Configure(IApplicationBuilder app, IWebHostEnvironment env, PostServiceContext dbContext)
{
if (env.IsDevelopment())
{
dbContext.Database.EnsureCreated
...
view rawStartup.cs hosted with ❤ by GitHub

Create the PostController:

using Microsoft.AspNetCore.Mvc;
using Microsoft.EntityFrameworkCore;
using PostService.Data;
using PostService.Entities;
using System.Collections.Generic;
using System.Threading.Tasks;
namespace PostService.Controllers
{
[Route("api/[controller]")]
[ApiController]
public class PostController : ControllerBase
{
private readonly PostServiceContext _context;
public PostController(PostServiceContext context)
{
_context = context;
}
[HttpGet]
public async Task<ActionResult<IEnumerable<Post>>> GetPost()
{
return await _context.Post.Include(x => x.User).ToListAsync();
}
[HttpPost]
public async Task<ActionResult<Post>> PostPost(Post post)
{
_context.Post.Add(post);
await _context.SaveChangesAsync();
return CreatedAtAction("GetPost", new { id = post.PostId }, post);
}
}
}

Currently, you can’t insert posts, because there are no users in the PostService database.


2. Use RabbitMQ and Configure Exchanges and Pipelines

In the second part of this guide, you will get RabbitMQ running. Then you will use the RabbitMQ admin web UI to configure the exchanges and pipelines for the application. Optionally you can use the admin UI to send messages to RabbitMQ.

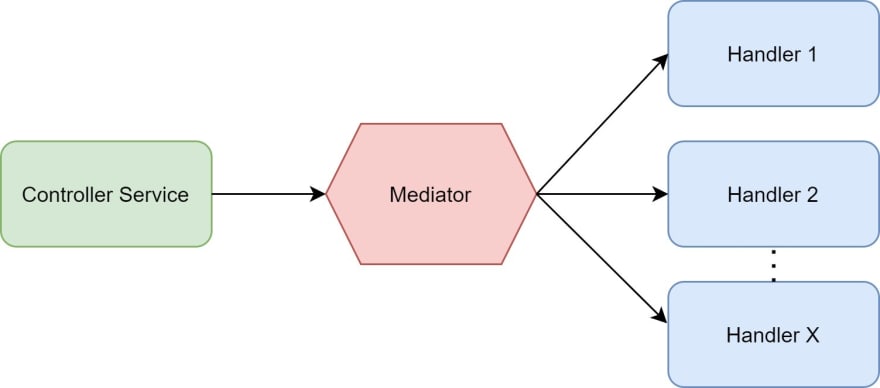
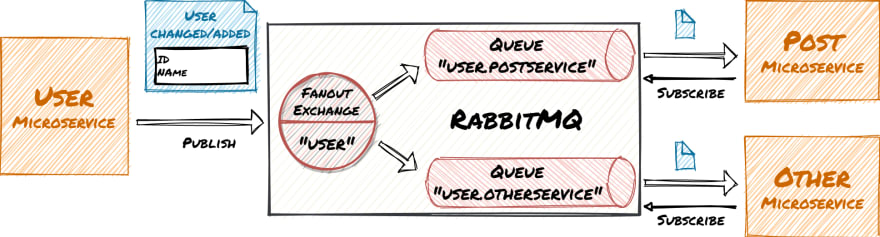
This graphic shows how the UserService publishes messages to RabbitMQ and the PostService and a potential other service consume those messages:

The easiest way to get RabbitMQ running is to install Docker Desktop. Then issue the following command (in one line in a console window) to start a RabbitMQ container with admin UI :

C:\dev>docker run -d  -p 15672:15672 -p 5672:5672 --hostname my-rabbit --name some-rabbit rabbitmq:3-management

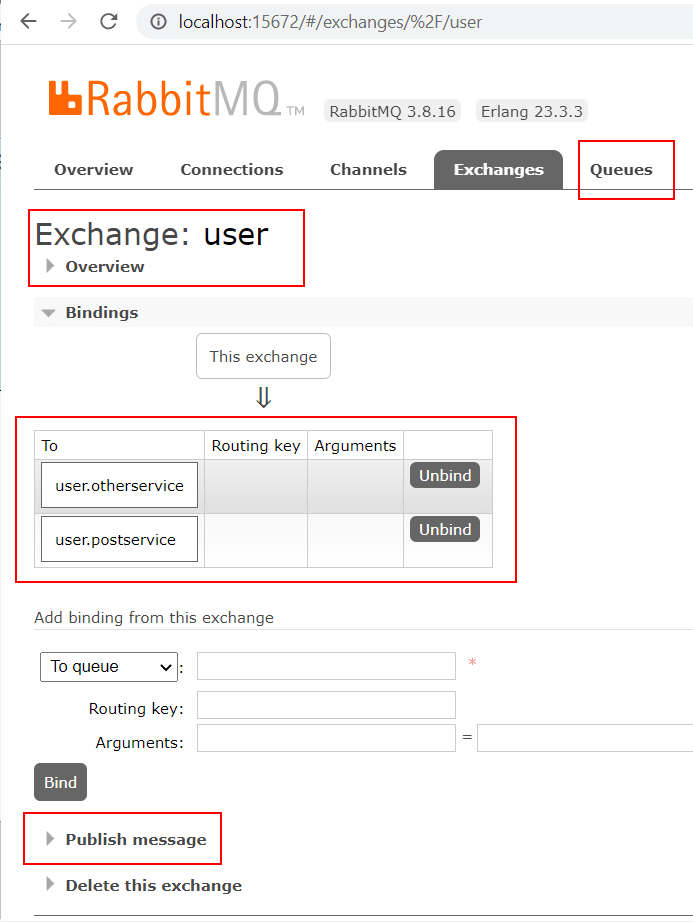
Open your browser on port 15672 and log in with the username “guest” and the password “guest”. Use the web UI to create an Exchange with the name “user” of type “Fanout” and two queues “user.postservice” and “user.otherservice”.

It is important to use the type “Fanout” so that the exchange copies the message to all connected queues.

You can also use the web UI to publish messages to the exchange and see how they get queued:


3. Publish and Consume Integration Events in the Microservices

In this part of the guide, you will bring the .NET microservices and RabbitMQ together. The UserService publishes events. The PostService consumes the events and adds/updates the users in its database.

Modify UserService.UserController to publish the integration events for user creation and update to RabbitMQ:

using Microsoft.AspNetCore.Mvc;
using Microsoft.EntityFrameworkCore;
using Newtonsoft.Json;
using RabbitMQ.Client;
using System.Collections.Generic;
using System.Text;
using System.Threading.Tasks;
using UserService.Data;
using UserService.Entities;
namespace UserService.Controllers
{
[Route("api/[controller]")]
[ApiController]
public class UsersController : ControllerBase
{
private readonly UserServiceContext _context;
public UsersController(UserServiceContext context)
{
_context = context;
}
[HttpGet]
public async Task<ActionResult<IEnumerable<User>>> GetUser()
{
return await _context.User.ToListAsync();
}
private void PublishToMessageQueue(string integrationEvent, string eventData)
{
// TOOO: Reuse and close connections and channel, etc,
var factory = new ConnectionFactory();
var connection = factory.CreateConnection();
var channel = connection.CreateModel();
var body = Encoding.UTF8.GetBytes(eventData);
channel.BasicPublish(exchange: "user",
routingKey: integrationEvent,
basicProperties: null,
body: body);
}
[HttpPut("{id}")]
public async Task<IActionResult> PutUser(int id, User user)
{
_context.Entry(user).State = EntityState.Modified;
await _context.SaveChangesAsync();
var integrationEventData = JsonConvert.SerializeObject(new
{
id = user.ID,
newname = user.Name
});
PublishToMessageQueue("user.update", integrationEventData);
return NoContent();
}
[HttpPost]
public async Task<ActionResult<User>> PostUser(User user)
{
_context.User.Add(user);
await _context.SaveChangesAsync();
var integrationEventData = JsonConvert.SerializeObject(new
{
id = user.ID,
name = user.Name
});
PublishToMessageQueue("user.add", integrationEventData);
return CreatedAtAction("GetUser", new { id = user.ID }, user);
}
}
}

The connection and other RabbitMQ objects are not correctly closed in these examples. They should also be reused. See the official RabbitMQ .NET tutorial

Modify (and misusePostService.Program to subscribe to the integration events and apply the changes to the PostService database:

using Microsoft.AspNetCore.Hosting;
using Microsoft.EntityFrameworkCore;
using Microsoft.Extensions.Hosting;
using Newtonsoft.Json.Linq;
using PostService.Data;
using PostService.Entities;
using RabbitMQ.Client;
using RabbitMQ.Client.Events;
using System;
using System.Linq;
using System.Text;
namespace PostService
{
public class Program
{
public static void Main(string[] args)
{
ListenForIntegrationEvents();
CreateHostBuilder(args).Build().Run();
}
private static void ListenForIntegrationEvents()
{
var factory = new ConnectionFactory();
var connection = factory.CreateConnection();
var channel = connection.CreateModel();
var consumer = new EventingBasicConsumer(channel);
consumer.Received += (model, ea) =>
{
var contextOptions = new DbContextOptionsBuilder<PostServiceContext>()
.UseSqlite(@"Data Source=post.db")
.Options;
var dbContext = new PostServiceContext(contextOptions);
var body = ea.Body.ToArray();
var message = Encoding.UTF8.GetString(body);
Console.WriteLine(" [x] Received {0}", message);
var data = JObject.Parse(message);
var type = ea.RoutingKey;
if (type == "user.add")
{
dbContext.User.Add(new User()
{
ID = data["id"].Value<int>(),
Name = data["name"].Value<string>()
});
dbContext.SaveChanges();
}
else if (type == "user.update")
{
var user = dbContext.User.First(a => a.ID == data["id"].Value<int>());
user.Name = data["newname"].Value<string>();
dbContext.SaveChanges();
}
};
channel.BasicConsume(queue: "user.postservice",
autoAck: true,
consumer: consumer);
}
public static IHostBuilder CreateHostBuilder(string[] args) =>
Host.CreateDefaultBuilder(args)
.ConfigureWebHostDefaults(webBuilder =>
{
webBuilder.UseStartup<Startup>();
});
}
}
view rawProgram.cs hosted with ❤ by GitHub

4. Test the Workflow

In the final part of this guide you will test the whole workflow:

Summary of the steps in the last part of this guide (you can access the services with the Swagger UI):

  • Call the UserService REST API and add a user to the user DB

  • The UserService will create an event that the PostService consumes and adds the user to the post DB

  • Access the PostService REST API and add a post for the user.

  • Call the PostService REST API and load the post and user from the post DB

  • Call the UserService REST API and rename the user

  • The UserService will create an event that the PostService consumes and updates the user’s name in the post DB

  • Call the PostService REST API and load the post and renamed user from the post DB

The user DB must be empty. You can delete the user.db (in the Visual Studio explorer) if you created users in previous steps of this guide. The calls to Database.EnsureCreated() will recreate the DBs on startup.

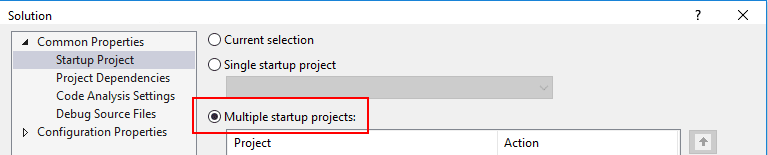
Configure both projects to run as service:

Change the App-URL of the PostService to another port (e.g. http://localhost:5001) so that both projects can be run in parallel. Configure the solution to start both projects and start debugging:

Use the Swagger UI to create a user in the UserService:

{
 "name": "Chris",
 "mail": "chris@chris.com",
 "otherData": "Some other data"
}

The generated userId might be different in your environment:

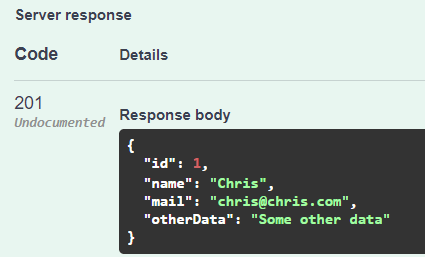
The integration event replicates the user to the PostService:

Now you can create a post in the PostServive Swagger UI (use your userId):

{
  "title": "MyFirst Post",
  "content": "Some interesting text",
  "userId": 1
}

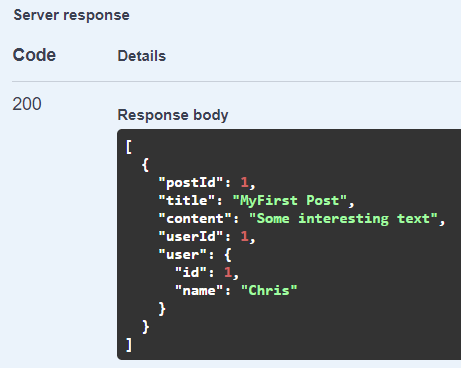
Read all posts. The username is included in the result:

Change the username in the UserService Swagger UI:

{
  "id": 1,
  "name": "My new name"
}

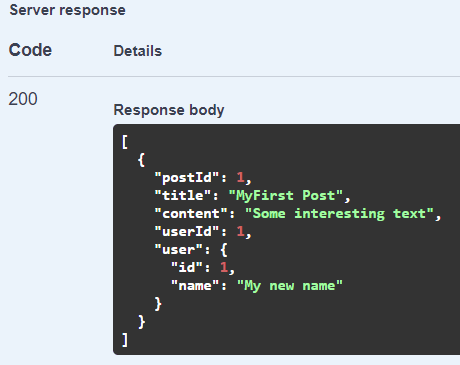
Then read the posts again and see the changed username:


5. Final Thoughts and Outlook

You created the working basis for an event-driven microservice architecture. Besides data replication, you can also use it for classic producer-consumer workflows, SAGAs, etc.

Please make sure to adjust the code to use it in a production environmentClean up the code and apply security best practices. Apply .NET Core design patterns, error handling, etc.

Currently messages could be lost in edge cases when RabbitMQ or the microservices crash. See my follow-up article on how to apply the transactional outbox pattern and make the application more resilient.

See my other articles on how to:

Please contact me if you have any questions, ideas, or suggestions.

How Netflix Scales its API with GraphQL Federation (Part 1)

  Netflix is known for its loosely coupled and highly scalable microservice architecture. Independent services allow for evolving at differe...