Tuesday, October 29, 2024

Implementing the Viewer Pattern in Federated GraphQL APIs

 when building a GraphQL API, you want to model the API around a "viewer". The viewer is the user who is currently authenticated and making the request to the API. This approach is called the "Viewer Pattern" and used by many popular GraphQL APIs, such as Facebook/Meta, GitHub, and others.ps 

We've recently had a Schema Design workshop with one of our clients and discussed how the Viewer Pattern could be leveraged in a federated GraphQL API. In this article, I want to share the insights from this workshop and explain the benefits of implementing the Viewer Pattern in a federated Graph.

What is the Viewer Pattern?

The Viewer Pattern usually adds a viewerme, or user field to the root of the GraphQL schema. This field represents the currently authenticated user and can be used to fetch data that is specific to the user, such as their profile, settings, but also data that is related to the user, such as their posts, comments, or other resources.

Let's take a look at an example schema that uses the Viewer Pattern:

1
2
3
4
5
6
7
8
9
10
11
12
13
14
15
16
17
18
19
20
21
22
23
type Query {
viewer: User!
user(id: ID!): User @requiresClaim(role: "admin")
}
type User {
id: ID!
name: String!
email: String!
posts: [Post!]!
comments: [Comment!]!
}
type Post {
id: ID!
title: String!
content: String!
}
type Comment {
id: ID!
content: String!
}

In this example, the currently logged-in user can fetch their own profile, id, name, email, and all the posts and comments they have created. If you're thinking in the context of a social media platform, it makes sense to model the API around the user, as we've always got an authenticated user and we usually want to fetch data that is related to them.

At the same time, we also have a user field that can be used to fetch data about other users, but it requires the user to have the admin role. Modeling our API like this makes it easy to define access control rules and to fetch data that is specific to the current user.

Let's say we'd like to fetch the currently logged-in user's profile, posts, and comments, this is how the query would look like:

1
2
3
4
5
6
7
8
9
10
11
12
13
14
15
16
query {
viewer {
id
name
email
posts {
id
title
content
}
comments {
id
content
}
}
}

In contrast, if we didn't use the Viewer Pattern, we would have to pass the user's ID as an argument to every field that fetches data related to the user, like their profile, posts, comments, and so on.

In this case, the GraphQL Schema would look like this:

1
2
3
4
5
6
7
8
9
10
11
12
13
14
15
16
17
18
19
20
21
22
type Query {
user(id: ID!): User
posts(userId: ID!): [Post!]!
comments(userId: ID!): [Comment!]!
}
type User {
id: ID!
name: String!
email: String!
}
type Post {
id: ID!
title: String!
content: String!
}
type Comment {
id: ID!
content: String!
}

In order to fetch the same data as in the previous example, we would have to write a query like this:

1
2
3
4
5
6
7
8
9
10
11
12
13
14
15
16
query($userId: ID!) {
user(id: $userId) {
id
name
email
}
posts(userId: $userId) {
id
title
content
}
comments(userId: $userId) {
id
content
}
}

How the Viewer Pattern affects Authorization in GraphQL Schema Design

As we've seen in the previous section, the Viewer Pattern has a big impact on how we model access control rules in our GraphQL schema. By adding a viewer field to the root of the Schema, we have a single point where we unify authorization rules. All child fields of the viewer field can assume that the user is authenticated and have access to the user ID, email, and other user-specific data like roles, permissions, and so on.

In contrast, if we didn't use the Viewer Pattern like in the second example, we would have to spread authentication and access control rules across all root fields in our schema.

Extending the Viewer Pattern with multi-tenant support

Another use-case that we've came across is the need to support multi-tenancy in our GraphQL API. Let's assume we're building a Shop-System, and the goal of our API is to allow users to log into multiple shops and not just operate in the context of a user, but also in the context of a shop (tenant).

Let's modify our previous example to support multi-tenancy:

1
2
3
4
5
6
7
8
9
10
11
12
13
14
15
16
17
18
19
20
21
22
23
24
25
26
27
28
29
30
31
32
33
34
enum Tenant {
A
B
}
type Query {
viewer(tenant: Tenant!): User!
user(id: ID!, tenant: Tenant!): User @requiresClaim(role: "admin")
}
type User {
id: ID!
tenant: Tenant!
name: String!
email: String!
cart: Cart!
}
type Cart {
id: ID!
items: [CartItem!]!
}
type CartItem {
id: ID!
product: Product!
quantity: Int!
}
type Product {
id: ID!
name: String!
price: Float!
}

In this example, we've added a tenant field to the User type and the viewer field. This allows us to fetch data that is specific to the user and the shop they are currently logged into.

Depending on the Shop-Site the user is currently logged into, the viewer field will return different data. We've also retained the user field, but extended it with a tenant argument as well to support multi-tenancy.

We could also slightly modify this approach to reduce duplication of the tenant argument by creating a Tenant type and adding it to the viewer field:

1
2
3
4
5
6
7
8
9
10
11
12
13
14
15
16
17
18
19
20
21
22
23
24
25
26
enum Tenant {
A
B
}
type Query {
tenant(tenant: Tenant!): TenantData!
}
type TenantData {
viewer: User!
user(id: ID!): User @requiresClaim(role: "admin")
}
type User {
id: ID!
tenant: Tenant!
name: String!
email: String!
cart: Cart!
}
type Cart {
id: ID!
items: [CartItem!]!
}

The upside of this approach is that we've got rid of the duplicate tenant argument in the viewer and user fields. The downside is that we've introduced an additional level of nesting in our schema. Depending on the number of root fields that actually depend on the tenant argument, this might simply introduce unnecessary complexity to our schema. I think the previous example is a good compromise between simplicity and multi-tenancy support.

Implementing the Viewer Pattern in a Federated GraphQL API

Now that we've seen how the Viewer Pattern can be used to model a GraphQL API, let's take a look at how we can implement it in a federated GraphQL API.

Let's assume we've got a federated GraphQL API that consists of multiple services, one service responsible for the user data (Users Subgraph), another service responsible for the shopping cart (Shopping Subgraph).

As the Shopping Subgraph depends on the user information to fetch the associated shopping cart, we need to make sure that these fields are "arguments" to the User type in the Shopping Subgraph. The way we can model this is by using the @key directive to mark certain fields as "Entity Keys" in our Subgraphs.

You can think of the @key directive in a federated GraphQL API as a way to tell the Router Service what "foreign keys" are required to "join" the data from different Subgraphs. Federation, in a way, is like a distributed SQL database, where each Subgraph is a table and the Router Service is the central component that knows how to join the data from different tables.

Let's take a look at how we would model the User and Shopping Subgraph to support the Viewer Pattern:

1
2
3
4
5
6
7
8
9
10
11
12
13
14
15
16
17
18
19
20
21
22
23
24
25
26
27
28
29
30
31
32
33
34
35
36
37
38
39
40
41
42
43
# Users Subgraph
enum Tenant {
A
B
}
type Query {
viewer(tenant: Tenant!): User!
}
type User @key(fields: "id tenant email") {
id: ID!
tenant: Tenant!
name: String!
email: String!
}
# Shopping Subgraph
type User @key(fields: "id tenant email") {
id: ID!
tenant: Tenant!
email: String!
cart: Cart!
}
type Cart {
id: ID!
items: [CartItem!]!
}
type CartItem {
id: ID!
product: Product!
quantity: Int!
}
type Product {
id: ID!
name: String!
price: Float!
}

In this example, we've added the @key directive to the User type in both the Users and Shopping Subgraph. This tells the Router that we need the idtenant, and email fields to join additional data on the User type from different Subgraphs.

If we compose the federated schema from these two Subgraphs, we'd end up with a federated schema that looks like this:

1
2
3
4
5
6
7
8
9
10
11
12
13
14
15
16
17
18
19
20
21
22
23
24
25
26
27
28
29
30
31
32
33
enum Tenant {
A
B
}
type Query {
viewer(tenant: Tenant!): User!
}
type User {
id: ID!
tenant: Tenant!
name: String!
email: String!
cart: Cart!
}
type Cart {
id: ID!
items: [CartItem!]!
}
type CartItem {
id: ID!
product: Product!
quantity: Int!
}
type Product {
id: ID!
name: String!
price: Float!
}

Let's take a look at how we would fetch the currently logged-in user's profile, cart, and cart items:

1
2
3
4
5
6
7
8
9
10
11
12
13
14
15
16
17
18
19
query {
viewer(tenant: A) {
id
name
email
cart {
id
items {
id
product {
id
name
price
}
quantity
}
}
}
}

Let's assume the Users Subgraph returs the following data:

1
2
3
4
5
6
7
8
9
10
{
"data": {
"viewer": {
"id": "1",
"tenant": "A",
"name": "Jens Neuse",
"email": "jens@wundergraph.com"
}
}
}

The Router would now make the following request to the Shopping Subgraph:

1
2
3
4
5
6
7
8
9
10
11
12
13
{
"query": "query($representations: [_Any!]!) { _entities(representations: $representations) { ... on User { id cart { id items { id product { id name price } quantity } } } } }",
"variables": {
"representations": [
{
"__typename": "User",
"id": "1",
"tenant": "A",
"email": "jens@wundergraph.com"
}
]
}
}

Note how we're passing the "Viewer Information" to the Shopping Subgraph in the representations variable.

1
2
3
4
5
6
{
"__typename": "User",
"id": "1",
"tenant": "A",
"email": "jens@wundergraph.com"
}

We haven't just structured our GraphQL Schema around the Viewer Pattern, but we've also established a standardised way for Subgraphs to fetch data that is specific to the currently logged-in user.

There's no need to pass the user's ID, tenant, or email as arguments to every field or to pass them as headers in the HTTP request, which would require the Subgraph to use a custom authentication middleware to extract the user's information and attach it to the request context.

How the Viewer Pattern simplifies the implementation of Subgraphs & Federated GraphQL APIs

If we're building a distributed system, it's quite likely that this system spans across multiple teams. Each team is responsible for implementing and maintaining their Subgraphs. It's possible that different teams use different programming languages, frameworks, and tools to build their Subgraphs. As such, it's important to establish standards, best practices, and patterns that make it easy for teams to build Subgraphs that work well together.

In an ideal world, we don't require all teams to implement a custom authentication middleware to extract the user's information from the request and attach it to the request context. We also don't want to require all teams to spread access control rules across all fields in their schema. We'd like to keep the implementation of Subgraphs as simple as possible.

By using the Viewer Pattern, we've established a standardised way for teams to add fields to the composed federated schema. In a Federated GraphQL API leveraging the Viewer Pattern, you can understand the User type as the "entry point" to the Subgraph.

Just as an example, let's add another Subgraph that adds purchase history to the User type:

1
2
3
4
5
6
7
8
9
10
11
12
13
14
15
16
17
18
19
20
21
22
23
24
25
26
# PurchaseHistory Subgraph
type User @key(fields: "id tenant email") {
id: ID!
tenant: Tenant!
email: String!
purchases: [Purchase!]!
}
type Purchase {
id: ID!
items: [PurchaseItem!]!
total: Float!
}
type PurchaseItem {
id: ID!
product: Product!
quantity: Int!
}
type Product {
id: ID!
name: String!
price: Float!
}

As you can see, the User type with the 3 fields idtenant, and email as well as the @key directive is the "entry point" to the Subgraph. We can use this pattern as a blueprint for all Subgraphs.

We don't have to worry about how the user's information is extracted from the request, and all Subgraphs can follow the same pattern that's natively supported by GraphQL, as we're simply reading the representations variable from the request.

Conclusion

The Viewer Pattern is a powerful way to model GraphQL APIs around a "viewer". It's not just a pattern that simplifies to model the API around the currently logged-in user, but it also makes the implementation of Subgraphs in a federated GraphQL API much simpler.

By using the Viewer Pattern, we're able to establish a standardised way for Subgraphs to define an "entry point" to their Subgraph, we've simplified authentication and have all the information natively available in the request to implement authorization rules in our resolvers.

Top 10 GraphQL Anti-patterns IME “The Horror”

 It is generic  thought but in my view they are not show stoppers. As Graphql already in many products now.

While GraphQL provides a flexible and powerful approach to building APIs, there are some common anti-patterns that developers may unintentionally implement when working with GraphQL query resolvers. These anti-patterns – the opposite of yesterday’s top 10 practices – can lead to issues such as performance bottlenecks, security vulnerabilities, or maintenance difficulties. Here are some of the top anti-patterns to avoid:

  1. N+1 Problem: The N+1 problem occurs when resolver functions trigger additional database queries within a loop or for each item in a list. This can result in a large number of database queries, leading to poor performance. Implement data batching techniques using tools like DataLoader to mitigate this issue, to learn more about DataLoader, check out this post.
  2. Over-fetching and Under-fetching: Over-fetching happens when a resolver fetches more data than the client actually needs, resulting in unnecessary data transfer and increased response size. On the other hand, under-fetching occurs when the resolver does not provide enough data to fulfill the client’s request, leading to additional round trips. Design your resolvers carefully to strike the right balance and only fetch the required data.
  3. Resolver Fatigue: Resolver fatigue refers to a scenario where a single GraphQL resolver is responsible for handling a large number of fields or complex logic. This can make the resolver codebase difficult to maintain, understand, and test. Break down your resolvers into smaller, more manageable units to avoid resolver fatigue.
  4. Deep Nesting: GraphQL allows for nested queries, but excessive nesting can lead to performance issues. Deeply nested queries may result in complex resolver logic and multiple database queries. Try to flatten your schema structure and optimize resolver logic to avoid unnecessary complexity.
  5. Lack of Caching: Not implementing caching mechanisms in your resolvers can result in repeated and costly data fetch operations. Introduce caching strategies, such as in-memory caching or distributed caches, to store frequently accessed data and reduce the load on your data sources.
  6. Inefficient Pagination: Pagination is commonly used in GraphQL to handle large datasets. Implementing pagination incorrectly can lead to performance issues and inefficient querying. Use appropriate pagination techniques, like cursor-based pagination, to efficiently retrieve and display data. To read more details on pagination and how it can be applied to GraphQL queries check out this post.
  7. No Rate Limiting: Without proper rate limiting mechanisms, your GraphQL API may be susceptible to abuse and DoS attacks. Implement rate limiting at the resolver or API level to control the number of requests and protect your server resources.
  8. Lack of Input Validation: Failing to validate and sanitize user input can lead to security vulnerabilities, such as SQL injection or unauthorized data access. Validate and sanitize input parameters in your resolvers to prevent these risks.
  9. Monolithic Resolvers: Creating monolithic resolvers that handle multiple unrelated responsibilities can lead to code duplication, reduced reusability, and increased maintenance effort. Follow the single responsibility principle and modularize your resolvers to improve code organization and maintainability.
  10. Insufficient Error Handling: Inadequate error handling in resolvers can result in unhandled exceptions or unclear error messages returned to the client. Implement comprehensive error handling and provide informative error messages to assist client developers in troubleshooting and debugging. For more details on error handling, check out this post.

By avoiding these anti-patterns and following established best practices, you can enhance the performance, security, and maintainability of your GraphQL query resolvers.

Saturday, July 6, 2024

Your First Microservice in .NET 6

Very simple way to start writing microservices... It is just writing one service and don't cover communication of microservices  or  deployment configuration , but really very good to start with Microservices.

 More than a buzzword, microservices are here to stay and are currently gaining popularity due to their acceptance in the systems development market. In this article, we’ll explore some valuable features available on the .NET platform and create our first microservice.

Results obtained recently show that the architecture based on microservices can be a great option when implementing new features.

This is due to the versatility of microservices, which, despite being relatively new, already present excellent results and their use has been growing exponentially, especially in recent years. With the evolution of the .NET platform, which is currently in its sixth version, implementing microservices has become even simpler.

In this article, we’ll spend a little time defining “microservices” and then we will create a microservice from scratch.

What Are Microservices?

Although there is no exact definition of what microservices are, based on what Martin Fowler, one of the biggest references on the subject today, says, microservices can be used to describe a way to design software applications composed of small sets of services that work and communicate with each other independently, consenting to a single concept. As well as its functioning, the implementation of microservices also happens independently.

Why Microservices?

We can say that microservices are the opposite of monoliths, and there is a lot of discussion about which would be ideal. There are many reasons to use monoliths, Fowler himself is an advocate of monoliths, but let’s focus on the advantages of using microservices.

Microservices make it easier to develop, test and deploy isolated parts of an application. Each microservice can be independently scaled as needed. Your implantation also is simple and does not need to have a dependence on other parts.

Each microservice uses its own database, reserved for its own scope, which avoids the many problems that can arise from two or more systems using the same database.

Obviously, microservices do not solve all problems and also have disadvantages. One of them is the complexity created by dividing a module into several microservices. Despite having some disadvantages, results obtained mainly in recent years show that systems with architectures based on microservices are achieving great results.

ASP.NET Core and Microservices

Like other development platforms, Microsoft has invested heavily to meet the requirements of an architecture based on microservices. Today .NET provides many resources for this purpose.

Microsoft’s official website has a lot of content about microservices-based architecture, including ebooks, tutorials, videos and challenges to help developers work with them.

With .NET 6, developing apps in a microservices architecture became even easier due to the new minimal APIs feature that simplifies many processes that were once mandatory but are now no longer needed.

Practical Approach

In this article, we will create a simple microservice, which performs a request in an API and return this data in the response.

Create the Project

To follow this tutorial, you need to download and install the .NET SDK (Software Development Kit), in version 6.

You can access the full source code at this link: Source Code.

The final structure of the project will be as follows:

Final structure

In your command prompt, run the following command to create your minimal API project:

dotnet new web -o UserManager -f net6.0

What do these commands mean?

  • The “dotnet new web” command creates a new application of type web API (that’s a REST API endpoint).
  • The “-o” parameter creates a directory named UserManager where your app is stored.
  • The “-f net6.0” command is to inform the .NET version that we will be using.

Now open the file “UserManager.csproj” generated at the root of the project with your favorite IDE—this tutorial uses Visual Studio 2022.

And then we have the following structure generated by the previous command. This is a standard minimal API framework in .NET 6.

Standard Structure Minimal API

Create the Microservice

The minimal API we created already contains everything we need to start implementing our microservice, which will have the following structure:

/Solution.sln
|
|---- UserManager.API.Default                       <-- Public API
|      |---- Program.cs                             <-- Dependency injection
|      |---- /Endpoints                                  
|      |     |---- UserEndpoints.cs                 <-- API Endpoints
|---- UserManager.Application                       <-- Layer for exposure of repository and services
|     |---- /Contracts                              <-- Contracts that are exposed to the customer
|     |     |---- /v1                               <-- Version
|     |     |     |---- /Users                      <-- Request and Response Classes
|     |     |     |     |---- /Response
|     |     |     |     |     |---- GetUsersResponse.cs
|     |---- /Services
|     |     |---- /v1                               <-- Version
|     |     |     |---- IUserConfigService          <-- Interface of service
|     |     |     |---- UserConfigService           <-- Service class

In Visual Studio rename the project from “UserManager” to “UserManager.API.Default”. Then, right-click on the solution name and follow the following sequence:

Add --> New Project… --> Class Library --> Next --> (Put the name: “UserManager.Application”) --> Next --> .NET 6.0 --> Create

We created the layer for exposure of repository and services. Now we will create the contracts that are exposed to the customer. In the UserManager.Application project, create a new folder and rename it with “Contracts”.

Inside it, create the following structure of folders v1–> Users --> Response, and inside “Response” create a new class called “GetUsersResponse”, and replace the code generated in it with this:

public record GetUsersResponse
{
    public List<User> Users { get; set; } = new List<User>();

    public record User
    {
        public int id { get; set; }
        public string name { get; set; }
        public string username { get; set; }
        public string email { get; set; }
        public Address address { get; set; }
        public string phone { get; set; }
        public string website { get; set; }
        public Company company { get; set; }
    }

    public record Address
    {
        public string street { get; set; }
        public string suite { get; set; }
        public string city { get; set; }
        public string zipcode { get; set; }
        public Geo geo { get; set; }
    }

    public record Geo
    {
        public string lat { get; set; }
        public string lng { get; set; }
    }

    public record Company
    {
        public string name { get; set; }
        public string catchPhrase { get; set; }
        public string bs { get; set; }
    }
}
C#

This class has a list of users, which will contain the data received in the response to the request.

Now let’s create the service class which will contain the microservice’s business rules.

Still in the UserManager.Application project, create a new folder and rename it with “Services”. Inside it, create a folder called “v1”. Inside v1, create a new interface called “IUserConfigService” and replace the code generated in it with this:

public interface IUserConfigService
{
    public Task<GetUsersResponse> GetAllUsersAsync();
    public Task<GetUsersResponse> GetUserByIdAsync(int id);
}
C#

And create a class called “UserConfigService” and replace the code generated in it with this:

using Newtonsoft.Json;
using static GetUsersResponse;

public class UserConfigService : IUserConfigService
{
    private readonly HttpClient _httpClient;

    public UserConfigService(HttpClient httpClient)
    {
        _httpClient = httpClient;
    }

    public async Task<GetUsersResponse> GetAllUsersAsync()
    {
        var userResponse = new GetUsersResponse();
        var uri = "https://jsonplaceholder.typicode.com/users";
        var responseString = await _httpClient.GetStringAsync(uri);
        var users = JsonConvert.DeserializeObject<List<User>>(responseString);

        userResponse.Users = users;
        return userResponse;
    }

    public async Task<GetUsersResponse> GetUserByIdAsync(int id)
    {
        var userResponse = new GetUsersResponse();
        var uri = $"https://jsonplaceholder.typicode.com/users?id={id}";
        var responseString = await _httpClient.GetStringAsync(uri);
        var users = JsonConvert.DeserializeObject<List<User>>(responseString);

        userResponse.Users = users;
        return userResponse;
    }
}
C#

You will need to install the “Newtonsoft.Json” library. You can do this through Visual Studio.

Explanation

First, we created an interface that will contain the main methods of the service. Next, we created the user service class, which will implement these methods.

In the method “GetAllUsersAsync” our service will fetch a list of users from the site “jsonplaceholder.typicode.com”, which provides a free fake API for testing and prototyping. It will return a list of users. This process will be done through a request with the “HttpClient” class that provides methods of communication between APIs.

And in the “GetUserByIdAsync” method it performs a parameterized search, sending the user id in the request and returning the user data correspondent.

In both cases, the return from the API is converted into a list of users compatible with the record User of the contract.

Creating the Endpoints

Now we need to create the endpoints that will use the service methods. In .NET 6 we don’t need a “controller” anymore so we’ll create a class that will implement the endpoints.

So in the project “UserManager.API.Default” create a new folder called “Endpoints”, and inside create a class called “UserEndpoints”. Then replace the code generated in it with this:

public static class UserEndpoints
{
    public static void MapUsersEndpoints(this WebApplication app)
    {
        app.MapGet("/v1/users", GetAllUsers);
        app.MapGet("/v1/users/{id}", GetUserById);
    }

    public static void AddUserServices(this IServiceCollection service)
    {
        service.AddHttpClient<IUserConfigService, UserConfigService>();
    }

    internal static IResult GetAllUsers(IUserConfigService service)
    {
        var users = service.GetAllUsersAsync().Result.Users;

        return users is not null ? Results.Ok(users) : Results.NotFound();
    }

    internal static IResult GetUserById(IUserConfigService service, int id)
    {
        var user = service.GetUserByIdAsync(id).Result.Users.SingleOrDefault();

        return user is not null ? Results.Ok(user) : Results.NotFound();
    }
}
C#

You will need to add in the project “UserManager.API.Default” the dependency of the project “UserManager.Application”. This is easy, just right-click on the file “Dependencies” of the “UserManager.API.Default” project --> “Add Project Reference…” and choose the project “UserManager.Application”

Explanation

In the class above, we are creating the endpoints in the “MapUsersEndpoints” method.

The “AddUserServices” method will inject the dependency of the Service and its interface, and the other two methods using the service return the search result—if it is null, a “NotFound” status will be displayed in the response.

Now in the Program class, we will add the service and swagger settings. So, replace the code from the Program.cs file with the code below.

var builder = WebApplication.CreateBuilder(args);

builder.Services.AddUserServices();
builder.Services.AddEndpointsApiExplorer();
builder.Services.AddSwaggerGen();

var app = builder.Build();

app.MapUsersEndpoints();

if (app.Environment.IsDevelopment())
{
    app.UseSwagger();
    app.UseSwaggerUI();
}

app.UseHttpsRedirection();

app.Run();
C#

You will need to install the “Swashbuckle.AspNetCore” library. You can do this through Visual Studio.

And in the file “launchSettings.json” under the setting "launchBrowser": true, add this:

"launchUrl": "swagger"

There are two places, inside “profiles” and “IIS Express”.

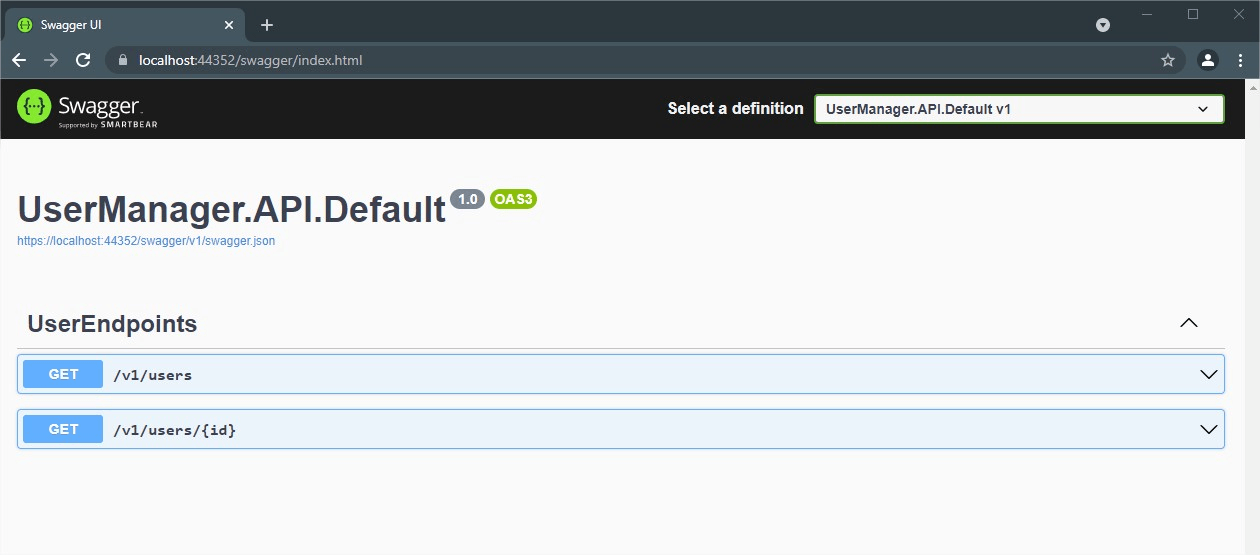
Finally, our microservice is ready to run. If you run it in Visual Studio using the “IIS Express” option, you will get the following result in your browser.

Swagger User Manager

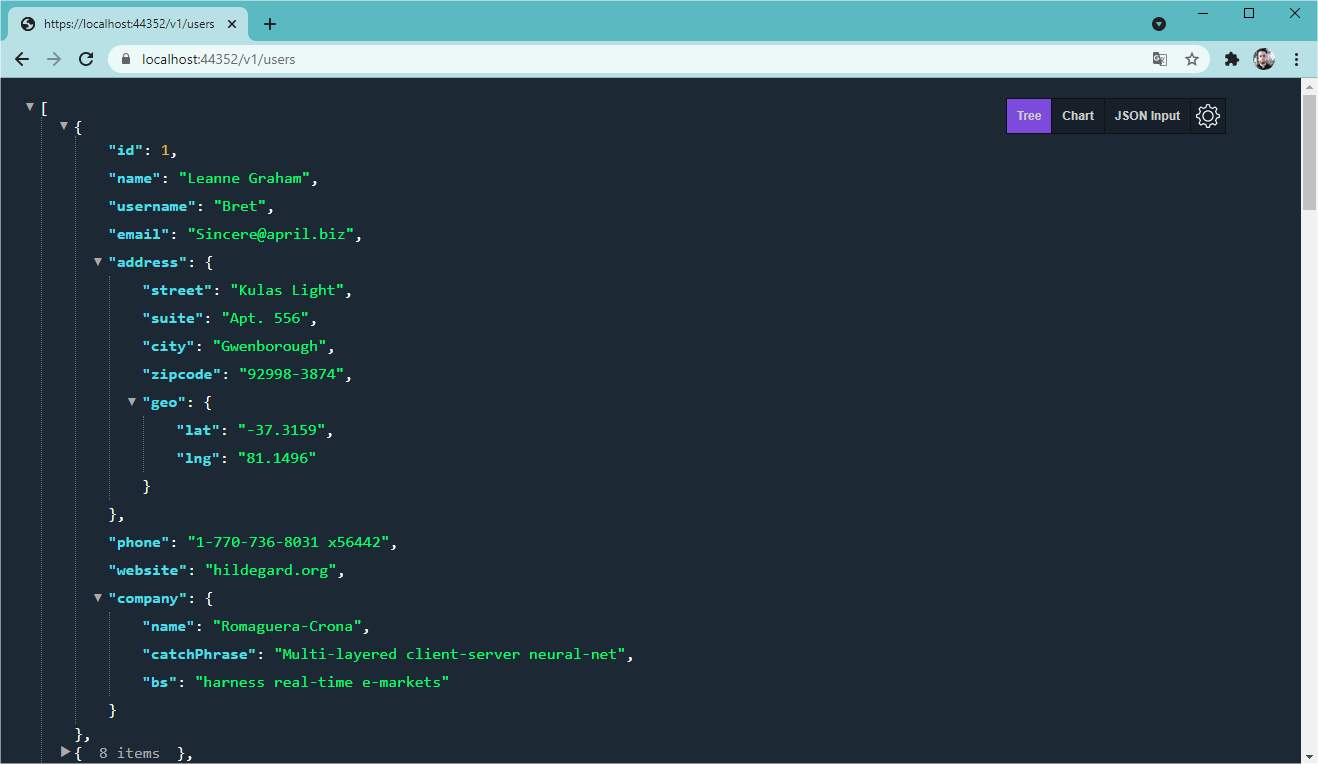
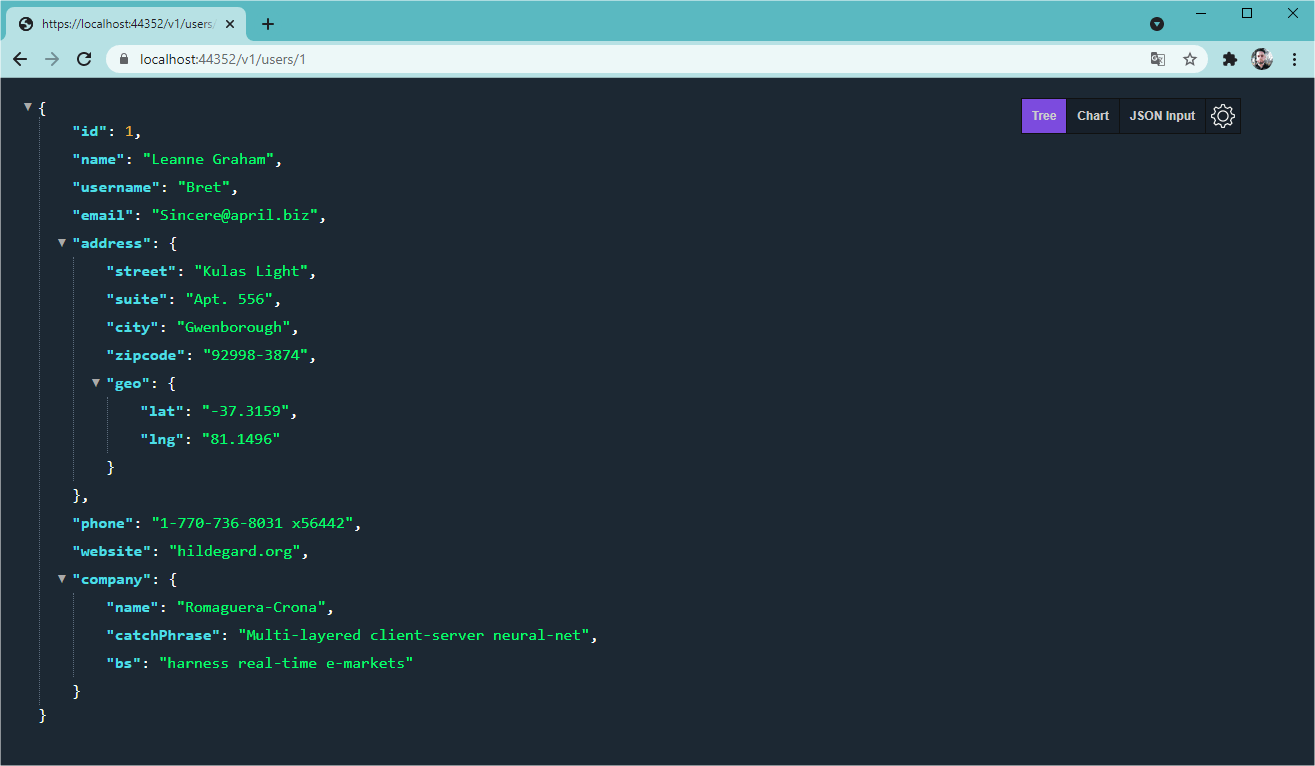
Now if you access the addresses https://localhost:<port number>/v1/users and https://localhost:<port number>/v1/users/1, you will get the following results:

Get all users

Get user by id

Conclusion

In this article, we had an introduction to the topic “microservices” and we created a simple microservice in .NET 6 that communicates with another API and displays user data.

The possibilities when working with microservices are endless, so feel free to implement more functions in the project, such as creation and update methods, communication with a database, validations, unit tests and much more.


React Profiler: A Step by step guide to measuring app performance

  As react applications are becoming more and more complex, measuring application performance becomes a necessary task for developers. React...