Thursday, January 27, 2022

How to Build an Event-Driven ASP.NET Core Microservice Architecture with RabbitMQ and Entity Framework

 Summary: very good article to learn 

1. implenting microservices 

2. using rabbitmq to send messages to service 


How to Build an Event-Driven ASP.NET Core Microservice Architecture with RabbitMQ and Entity Framework

Use RabbitMQ, C#, REST-API and Entity Framework for asynchronous decoupled communication and eventually consistency with integration events and publish-subscribe

In this guide, you will create two C# ASP.NET Core Microservices. Both microservices have their own bounded context and domain model. Each microservice has its own database and REST API. One microservice publishes integration events, that the other microservice consumes.

Decoupled Microservices — A Real-World Example With Code

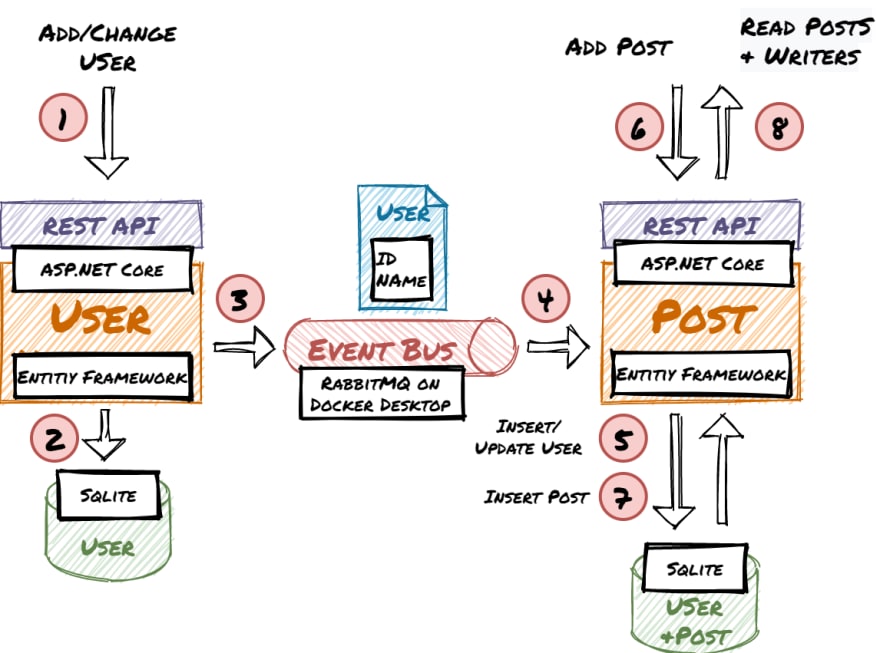
The application uses a real-world example with users that can write posts. The user microservice allows creating and editing users. In the user domain, the user entity has several properties like name, mail, etc. In the post domain, there is also a user so the post microservice can load posts and display the writers without accessing the user microservice. The user entity in the post domain is much simpler:

The microservices are decoupled and the asynchronous communication leads to eventual consistency. This kind of architecture is the basis for loosely coupled services and supports high scalability. The microservices access their example Sqlite databases via Entity Framework and exchange messages via RabbitMQ (e.g. on Docker Desktop).

Overview diagram of the workflow, components, and technologies:

The code and configurations in this article are not suitable for production use. This guide focuses on the concepts and how the components interact. For this purpose error handling, etc. is omitted.

Steps of this Guide

  1. Create the .NET Core Microservices

  2. Use RabbitMQ and Configure Exchanges and Pipelines

  3. Publish and Consume Integration Events in the Microservices

  4. Test the Workflow

  5. Final Thoughts and Outlook


1. Create the .NET Core Microservices

In the first part of this guide, you will create the User and Post Microservice. You will add the Entities and basic Web APIs. The entities will be stored and retrieved via Entity Framework from Sqlite DBs. Optionally you can test the User Microservice with the Swagger UI in the browser.

Let’s get started.

Install Visual Studio Community (it’s free) with the ASP.NET and web development workload.

Create a solution and add the two ASP.NET Core 5 Web API projects “UserService” and “PostService”. Disable HTTPS and activate OpenAPI Support.

For both projects install the following NuGet packages:

  • Microsoft.EntityFrameworkCore.Tools

  • Microsoft.EntityFrameworkCore.Sqlite

  • RabbitMQ.Client

Implement the UserService

Create the User Entity:

namespace UserService.Entities
{
public class User
{
public int ID { get; set; }
public string Name { get; set; }
public string Mail { get; set; }
public string OtherData { get; set; }
}
}
view rawUser.cs hosted with ❤ by GitHub

Create the UserServiceContext:

using Microsoft.EntityFrameworkCore;
namespace UserService.Data
{
public class UserServiceContext : DbContext
{
public UserServiceContext (DbContextOptions<UserServiceContext> options)
: base(options)
{
}
public DbSet<UserService.Entities.User> User { get; set; }
}
}

Edit Startup.cs to configure the UserServiceContext to use Sqlite and call Database.EnsureCreated() to make sure the database contains the entity schema:

public void ConfigureServices(IServiceCollection services)
{
services.AddControllers();
services.AddSwaggerGen(c =>
{
c.SwaggerDoc("v1", new OpenApiInfo { Title = "UserService", Version = "v1" });
});
services.AddDbContext<UserServiceContext>(options =>
options.UseSqlite(@"Data Source=user.db"));
}
public void Configure(IApplicationBuilder app, IWebHostEnvironment env, UserServiceContext dbContext)
{
if (env.IsDevelopment())
{
dbContext.Database.EnsureCreated();
...
view rawStartup.cs hosted with ❤ by GitHub

Create the UserController (It implements only the methods necessary for this demo):

using Microsoft.AspNetCore.Mvc;
using Microsoft.EntityFrameworkCore;
using System.Collections.Generic;
using System.Threading.Tasks;
using UserService.Data;
using UserService.Entities;
namespace UserService.Controllers
{
[Route("api/[controller]")]
[ApiController]
public class UsersController : ControllerBase
{
private readonly UserServiceContext _context;
public UsersController(UserServiceContext context)
{
_context = context;
}
[HttpGet]
public async Task<ActionResult<IEnumerable<User>>> GetUser()
{
return await _context.User.ToListAsync();
}
[HttpPut("{id}")]
public async Task<IActionResult> PutUser(int id, User user)
{
_context.Entry(user).State = EntityState.Modified;
await _context.SaveChangesAsync();
return NoContent();
}
[HttpPost]
public async Task<ActionResult<User>> PostUser(User user)
{
_context.User.Add(user);
await _context.SaveChangesAsync();
return CreatedAtAction("GetUser", new { id = user.ID }, user);
}
}
}

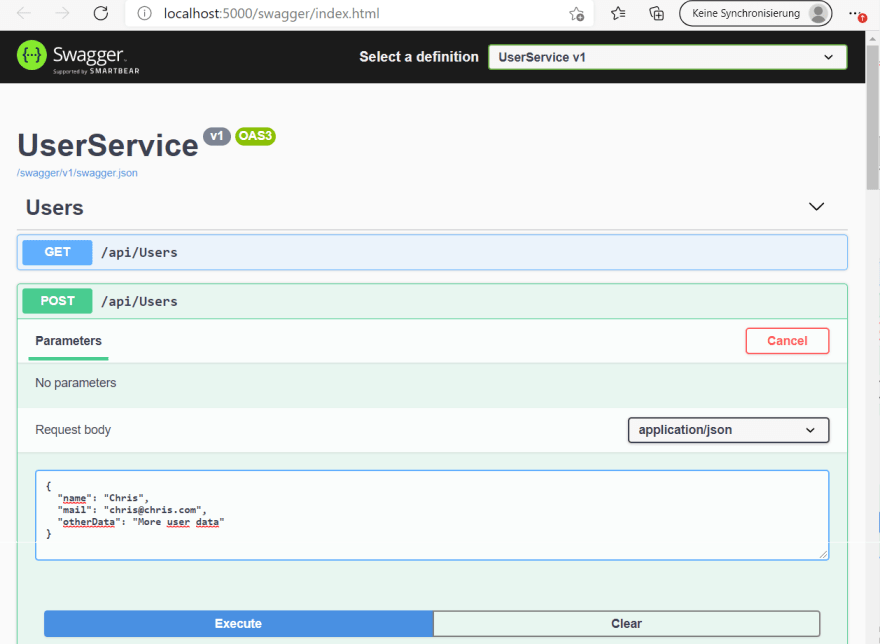
Debug the UserService project and it will start your browser. You can use the swagger UI to test if creating and reading users is working:

Implement the PostService

Create the User and Post entities:

namespace PostService.Entities
{
public class User
{
public int ID { get; set; }
public string Name { get; set; }
}
}
view rawUser.cs hosted with ❤ by GitHub
namespace PostService.Entities
{
public class Post
{
public int PostId { get; set; }
public string Title { get; set; }
public string Content { get; set; }
public int UserId { get; set; }
public User User { get; set; }
}
}
view rawPost.cs hosted with ❤ by GitHub

Create the PostServiceContext:

using Microsoft.EntityFrameworkCore;
namespace PostService.Data
{
public class PostServiceContext : DbContext
{
public PostServiceContext (DbContextOptions<PostServiceContext> options)
: base(options)
{
}
public DbSet<PostService.Entities.Post> Post { get; set; }
public DbSet<PostService.Entities.User> User { get; set; }
}
}

Edit startup.cs to configure the UserServiceContext to use Sqlite and call Database.EnsureCreated() to make sure the database contains the entity schema:

public void ConfigureServices(IServiceCollection services)
{
services.AddControllers();
services.AddSwaggerGen(c =>
{
c.SwaggerDoc("v1", new OpenApiInfo { Title = "PostService", Version = "v1" });
});
services.AddDbContext<PostServiceContext>(options =>
options.UseSqlite(@"Data Source=post.db"));
}
public void Configure(IApplicationBuilder app, IWebHostEnvironment env, PostServiceContext dbContext)
{
if (env.IsDevelopment())
{
dbContext.Database.EnsureCreated
...
view rawStartup.cs hosted with ❤ by GitHub

Create the PostController:

using Microsoft.AspNetCore.Mvc;
using Microsoft.EntityFrameworkCore;
using PostService.Data;
using PostService.Entities;
using System.Collections.Generic;
using System.Threading.Tasks;
namespace PostService.Controllers
{
[Route("api/[controller]")]
[ApiController]
public class PostController : ControllerBase
{
private readonly PostServiceContext _context;
public PostController(PostServiceContext context)
{
_context = context;
}
[HttpGet]
public async Task<ActionResult<IEnumerable<Post>>> GetPost()
{
return await _context.Post.Include(x => x.User).ToListAsync();
}
[HttpPost]
public async Task<ActionResult<Post>> PostPost(Post post)
{
_context.Post.Add(post);
await _context.SaveChangesAsync();
return CreatedAtAction("GetPost", new { id = post.PostId }, post);
}
}
}

Currently, you can’t insert posts, because there are no users in the PostService database.


2. Use RabbitMQ and Configure Exchanges and Pipelines

In the second part of this guide, you will get RabbitMQ running. Then you will use the RabbitMQ admin web UI to configure the exchanges and pipelines for the application. Optionally you can use the admin UI to send messages to RabbitMQ.

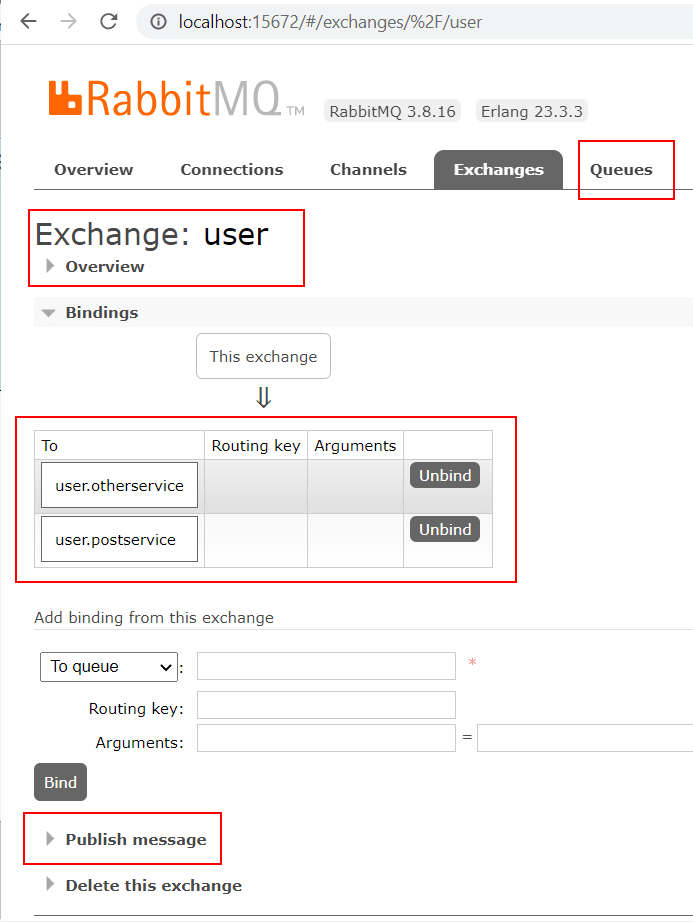
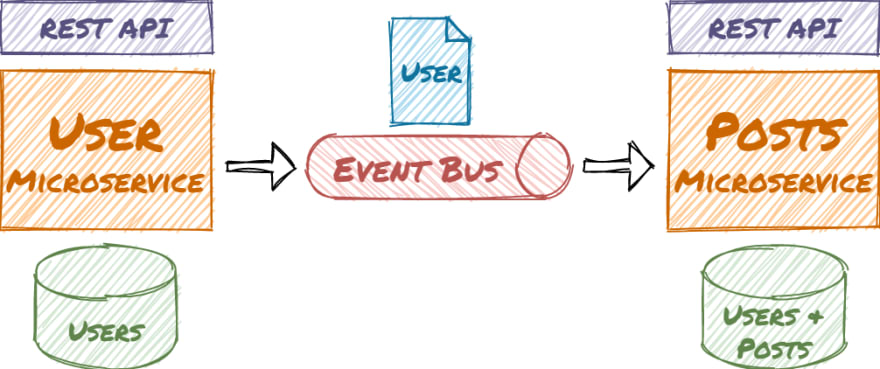
This graphic shows how the UserService publishes messages to RabbitMQ and the PostService and a potential other service consume those messages:

The easiest way to get RabbitMQ running is to install Docker Desktop. Then issue the following command (in one line in a console window) to start a RabbitMQ container with admin UI :

C:\dev>docker run -d  -p 15672:15672 -p 5672:5672 --hostname my-rabbit --name some-rabbit rabbitmq:3-management

Open your browser on port 15672 and log in with the username “guest” and the password “guest”. Use the web UI to create an Exchange with the name “user” of type “Fanout” and two queues “user.postservice” and “user.otherservice”.

It is important to use the type “Fanout” so that the exchange copies the message to all connected queues.

You can also use the web UI to publish messages to the exchange and see how they get queued:


3. Publish and Consume Integration Events in the Microservices

In this part of the guide, you will bring the .NET microservices and RabbitMQ together. The UserService publishes events. The PostService consumes the events and adds/updates the users in its database.

Modify UserService.UserController to publish the integration events for user creation and update to RabbitMQ:

using Microsoft.AspNetCore.Mvc;
using Microsoft.EntityFrameworkCore;
using Newtonsoft.Json;
using RabbitMQ.Client;
using System.Collections.Generic;
using System.Text;
using System.Threading.Tasks;
using UserService.Data;
using UserService.Entities;
namespace UserService.Controllers
{
[Route("api/[controller]")]
[ApiController]
public class UsersController : ControllerBase
{
private readonly UserServiceContext _context;
public UsersController(UserServiceContext context)
{
_context = context;
}
[HttpGet]
public async Task<ActionResult<IEnumerable<User>>> GetUser()
{
return await _context.User.ToListAsync();
}
private void PublishToMessageQueue(string integrationEvent, string eventData)
{
// TOOO: Reuse and close connections and channel, etc,
var factory = new ConnectionFactory();
var connection = factory.CreateConnection();
var channel = connection.CreateModel();
var body = Encoding.UTF8.GetBytes(eventData);
channel.BasicPublish(exchange: "user",
routingKey: integrationEvent,
basicProperties: null,
body: body);
}
[HttpPut("{id}")]
public async Task<IActionResult> PutUser(int id, User user)
{
_context.Entry(user).State = EntityState.Modified;
await _context.SaveChangesAsync();
var integrationEventData = JsonConvert.SerializeObject(new
{
id = user.ID,
newname = user.Name
});
PublishToMessageQueue("user.update", integrationEventData);
return NoContent();
}
[HttpPost]
public async Task<ActionResult<User>> PostUser(User user)
{
_context.User.Add(user);
await _context.SaveChangesAsync();
var integrationEventData = JsonConvert.SerializeObject(new
{
id = user.ID,
name = user.Name
});
PublishToMessageQueue("user.add", integrationEventData);
return CreatedAtAction("GetUser", new { id = user.ID }, user);
}
}
}

The connection and other RabbitMQ objects are not correctly closed in these examples. They should also be reused. See the official RabbitMQ .NET tutorial

Modify (and misusePostService.Program to subscribe to the integration events and apply the changes to the PostService database:

using Microsoft.AspNetCore.Hosting;
using Microsoft.EntityFrameworkCore;
using Microsoft.Extensions.Hosting;
using Newtonsoft.Json.Linq;
using PostService.Data;
using PostService.Entities;
using RabbitMQ.Client;
using RabbitMQ.Client.Events;
using System;
using System.Linq;
using System.Text;
namespace PostService
{
public class Program
{
public static void Main(string[] args)
{
ListenForIntegrationEvents();
CreateHostBuilder(args).Build().Run();
}
private static void ListenForIntegrationEvents()
{
var factory = new ConnectionFactory();
var connection = factory.CreateConnection();
var channel = connection.CreateModel();
var consumer = new EventingBasicConsumer(channel);
consumer.Received += (model, ea) =>
{
var contextOptions = new DbContextOptionsBuilder<PostServiceContext>()
.UseSqlite(@"Data Source=post.db")
.Options;
var dbContext = new PostServiceContext(contextOptions);
var body = ea.Body.ToArray();
var message = Encoding.UTF8.GetString(body);
Console.WriteLine(" [x] Received {0}", message);
var data = JObject.Parse(message);
var type = ea.RoutingKey;
if (type == "user.add")
{
dbContext.User.Add(new User()
{
ID = data["id"].Value<int>(),
Name = data["name"].Value<string>()
});
dbContext.SaveChanges();
}
else if (type == "user.update")
{
var user = dbContext.User.First(a => a.ID == data["id"].Value<int>());
user.Name = data["newname"].Value<string>();
dbContext.SaveChanges();
}
};
channel.BasicConsume(queue: "user.postservice",
autoAck: true,
consumer: consumer);
}
public static IHostBuilder CreateHostBuilder(string[] args) =>
Host.CreateDefaultBuilder(args)
.ConfigureWebHostDefaults(webBuilder =>
{
webBuilder.UseStartup<Startup>();
});
}
}
view rawProgram.cs hosted with ❤ by GitHub

4. Test the Workflow

In the final part of this guide you will test the whole workflow:

Summary of the steps in the last part of this guide (you can access the services with the Swagger UI):

  • Call the UserService REST API and add a user to the user DB

  • The UserService will create an event that the PostService consumes and adds the user to the post DB

  • Access the PostService REST API and add a post for the user.

  • Call the PostService REST API and load the post and user from the post DB

  • Call the UserService REST API and rename the user

  • The UserService will create an event that the PostService consumes and updates the user’s name in the post DB

  • Call the PostService REST API and load the post and renamed user from the post DB

The user DB must be empty. You can delete the user.db (in the Visual Studio explorer) if you created users in previous steps of this guide. The calls to Database.EnsureCreated() will recreate the DBs on startup.

Configure both projects to run as service:

Change the App-URL of the PostService to another port (e.g. http://localhost:5001) so that both projects can be run in parallel. Configure the solution to start both projects and start debugging:

Use the Swagger UI to create a user in the UserService:

{
 "name": "Chris",
 "mail": "chris@chris.com",
 "otherData": "Some other data"
}

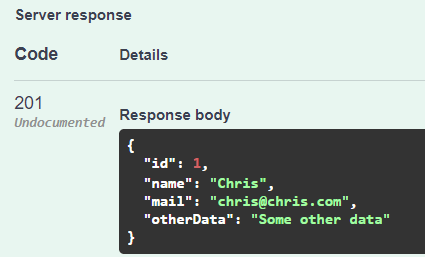
The generated userId might be different in your environment:

The integration event replicates the user to the PostService:

Now you can create a post in the PostServive Swagger UI (use your userId):

{
  "title": "MyFirst Post",
  "content": "Some interesting text",
  "userId": 1
}

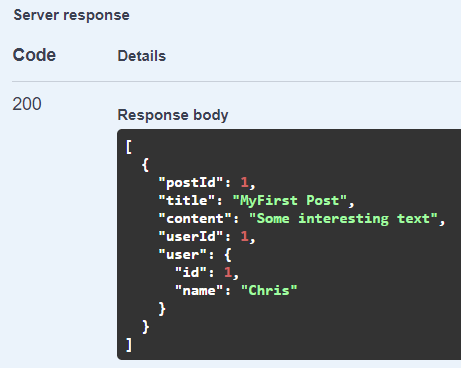
Read all posts. The username is included in the result:

Change the username in the UserService Swagger UI:

{
  "id": 1,
  "name": "My new name"
}

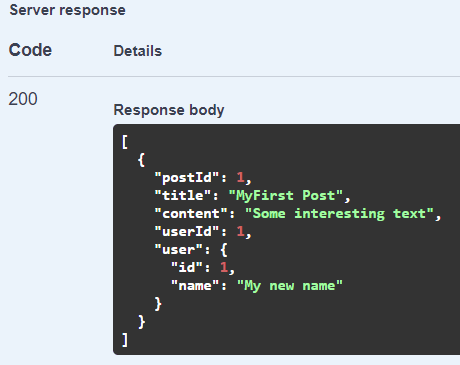
Then read the posts again and see the changed username:


5. Final Thoughts and Outlook

You created the working basis for an event-driven microservice architecture. Besides data replication, you can also use it for classic producer-consumer workflows, SAGAs, etc.

Please make sure to adjust the code to use it in a production environmentClean up the code and apply security best practices. Apply .NET Core design patterns, error handling, etc.

Currently messages could be lost in edge cases when RabbitMQ or the microservices crash. See my follow-up article on how to apply the transactional outbox pattern and make the application more resilient.

See my other articles on how to:

Please contact me if you have any questions, ideas, or suggestions.
Thursday, December 3, 2020

A Recipe for Refactoring a Legacy Spring Application Codebase

 We’ve all faced the problem of an ever-growing code base that slowly loses structure. Classes that were once small start to inflate, lines of code grow from hundreds to thousands, components become tightly coupled, and the single responsibility principle erodes. For a fast growing R&D department, this technical debt becomes ever more important to address in order to scale.

A bit of background: Datorama is a marketing intelligence platform that transforms the way marketers optimize their marketing performance, business impact, and customer loyalty. Founded back in 2012, we started off with 3 engineers, and have doubled our engineering head count year over year ever since. This exponential growth has, of course, come with some scaling challenges, and one evident challenge is how to keep an ever-growing code base organized and easy to use. In terms of our tech stack, being a data company, big parts of our platform are written in Java, some of those are written in Spring and most of our engineers use IntelliJ as their IDE.

We have two main efforts. Splitting the code into modules and micro-services. Modules and then micro-service is a great track to do it. So recently I made some refactoring in our code base splitting a part of a service to its own maven module. This service I was working on is built in Spring.

The specific problem we were facing lately is that parts of our codebase became too tightly coupled in a single, monolithic Maven module. It was not uncommon to stumble upon really long files (+2000 lines of code), there was no separation of concerns, and no single responsibility. Such a tightly coupled codebase also creates a ripple of side effects:

  • Build time takes longer, since your entire code gets compiled even when changes in other classes are made, all because they’re in the same module. Don’t underestimate this, build time can take several minutes! (multiply by 10 it gets to ~1h per day!).
  • When tests break it’s harder to understand why because everything is in the same module.
  • Engineers become inefficient and unhappy because most of the time they get lost in those tough lines of code.
  • The code becomes increasingly harder to modify and test.

In this post, I’d like to present a technique we’ve started using in order to tackle the ever-increasing code complexity by applying massive refactoring in a structured process:

Step 1: Define the Problem In Detail

We start by selecting a product module that can be split out, e.g. that is not strongly linked to other modules and can “live” independently.
This is not an easy task and the key to success is the ability to visualize your code’s structure and identify independent clusters. For this, we start out by using the excellent IntelliJ plugin — Java Method Reference Diagram. This plugin allows you to visualize a single class, showing you relationships between methods, fields and other classes in a usage graph. Put in their words, it provides you with:

“visual information about orphaned groups, meaning independent clusters of methods and fields that are candidates for refactoring to separate classes”

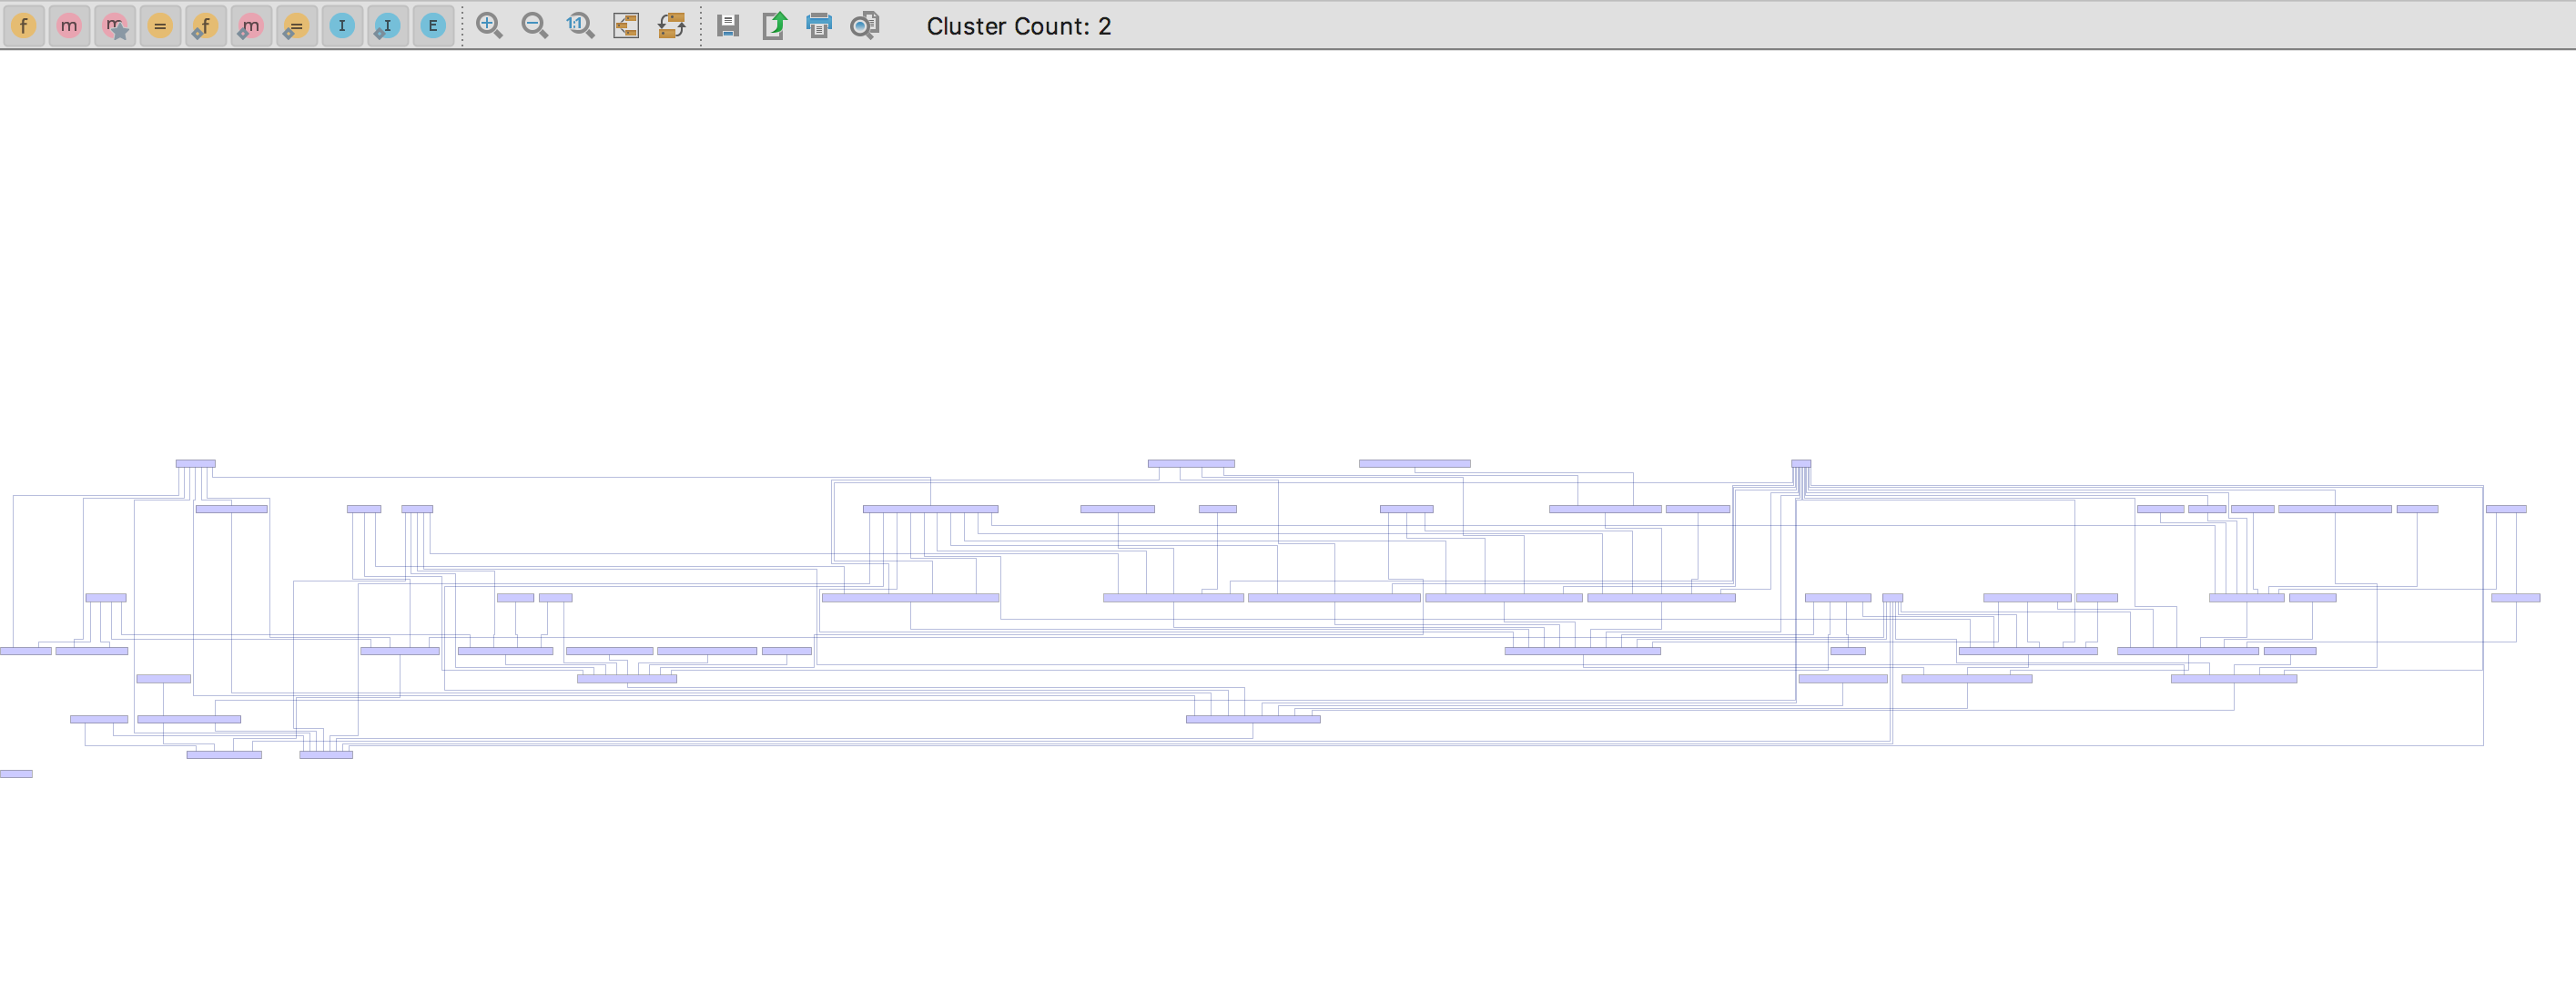
More often then not, once you choose a candidate class you’ll notice that when you first use this plugin the diagram looks like hell.

Image for post
Class diagram with initializers, fields, methods, statics, interfaces, etc.

In order to simplify things and get better visibility, I’d suggest hiding all statics, members, interfaces and keep only methods. The reasoning for this is that statics can always be extracted to a shared classes and made public, while fields are usually dependency-injected with Spring’s @Autowired annotation, meaning they could also be injected elsewhere after we refactor.

Image for post
Class diagram with only methods.

Notice how the filtered diagram is cleaner than the original one, albeit still crowded. Now start looking for clusters which are candidates for extraction. This is the toughest step. Don’t underestimate it, be patient, the devil is in the details. Try stretching imaginary rectangles around blocks of interconnected methods with shared functionality:

Image for post
Examples of possible clusters.

Step 2: Structural Decomposition

Now that you have identified separated clusters, move them to their own services, that’s how we’ll solve all those issues stated in the beginning. We’ll achieve single responsibility and it will be much easier to modify and test this “new” code. A simple step-by-step here is:

  1. Create a new class, managed by Spring (annotated with @Service, @Component etc.)
  2. Move a cluster of methods as is from the original class to the new one.
  3. In the new class, resolve all dependencies of class members and static fields. You will most likely need to auto-wire services that were available in the original class.
  4. In the original class, auto-wire the new service class. Delegate all of the moved method calls to those methods in the new class, while changing methods in the new class to be public / protected.
  5. Find all usages in the code that were calling public methods in the original class and change them to call the same methods in the new class.
  6. Rinse and repeat.

If you really want to leverage your refactoring, after you’ve extracted your code, go over these steps again in your “new” code and see if there is room for more extractions. Your classes will become super neat and tidy.

Step 3: Identify Anti-Patterns:

I believe anti-patterns exist in every application codebase, some are hard to identify.

Explore your “new” code and take the effort to identify those anti-patterns.
For example in the code I extracted, I found some very long if/else blocks where each case in the block referenced to a specific type of action needed to be done. Here’s a simplified example:

Step 4: Replace with Design Patterns:

This code could be replaced with a very nice and clean design pattern called Command pattern.

From the link:

Command declares an interface for all commands, providing a simple execute() method which asks the Receiver of the command to carry out an operation. The Receiver has the knowledge of what to do to carry out the request. The Invoker holds a command and can get the Command to execute a request by calling the execute method. The Client creates ConcreteCommands and sets a Receiver for the command. The ConcreteCommand defines a binding between the action and the receiver. When the Invoker calls execute the ConcreteCommand will run one or more actions on the Receiver.

In our implementation of the command pattern, note how each concrete command implementation is defined as a Spring @Service. This will serve us later for auto-wiring these commands and build an enum map of them.

Action command implementation
Initialization of command classes using Spring
Image for post
Structure before refactoring
Image for post
Structure after refactoring

In conclusion, Identify your code candidate, extract it and improve its design. You’ll make your code more readable, maintainable, extendable and testable. On top of all of this, think that all this refactoring has relatively low risk since we’re just moving things around and keeping business logic untouched, it’s just the structure that changes.

Datorama Engineering

Building things the Datorama way

Thanks to Ilai Gilenberg and Raanan Raz. 

Tuesday, December 1, 2020

From Legacy to Dependency Injection

We’ve all encountered tightly-bound code, and our first instinct is to correct it. However, there are only so many hours in a sprint, and it’s not always convenient to go on a large refactoring spree when the backlog is filling up. With JustMock, you can still ensure the code works, and it will set you up for the cleaning that will take place at a later time.

The code I am about to show is rather simplistic, and it may not be much of a burden to refactor when encountered. The principles are the same in testing the code then refactoring to achieve higher quality.

Here is a simple action on an ASP.NET MVC controller:

public ActionResult Index()
{
    var repository = new BookRepository();
    var books = repository.GetAll();
    return View(books);
}

These three lines of code retrieves all books from a BookRepository and passes them to the view. Testing this controller action doesn’t appear to be very difficult:

[Fact]
public void Index_Should_Return_All_Books_To_View()
{
    BookController controller = new BookController();
    var result = (ViewResult)controller.Index();
    var books = (IEnumerable<BookModel>)result.Model;
    Assert.Equal(5, books.Count());
}

This test has a major problem: it must call all the way to the backing data storage. I have been in many organizations that attempt to get around this by creating a “test” database. This approach leads to even more issues. First, the lack of code isolation means it can be more time consuming to track down the cause of a bug. If this test doesn’t work, I will need to figure out if this code is broken, if the repository is broken, or if there’s bad code in another layer that isn’t immediately noticeable. Next, it takes more work to make sure side effects in the database do not affect unrelated. It can also be troublesome to maintain the data. Finally, testing through every layer of the application is slow. When the application grows large and the tests become more numerous, it becomes a chore to run them… and you might as well forget automating it on check-in.

Here’s how to use JustMock to isolate this unit of code without refactoring.

[Fact]
public void Index_Should_Return_All_Books_To_View()
{
    var repository = Mock.Create<BookRepository>();
     
    repository.Arrange(r => r.GetAll())
              .Returns(Enumerable.Repeat<BookModel>(new BookModel(), 5))
              .IgnoreInstance();
 
    BookController controller = new BookController();
    var result = (ViewResult)controller.Index();
    var books = (IEnumerable<BookModel>)result.Model;
    Assert.Equal(5, books.Count());
}

 The first step was to create a mock object of the BookRepository used in the controller action. There isn’t an interface for this class, so it’s a good thing that JustMock will mock a concrete class. Next, I arranged for the repository to return a sequence of books when the GetAll() method is called on it. I then used IgnoreInstance() so that every instance of BookRepository encountered in this test would be replaced with the mock object.

It was that easy, and you’re now in a position to refactor the code to support dependency injection with minimal changes to your test.

First, we should give the BookRepository an interface (you can cheat and use the Extract Interface refactoring).

public interface IBookRepository
{
    IEnumerable<BookModel> GetAll();
}

 Next, promote the repository variable to a field (Introduce Field refactoring) and change its type to IBookRepository. Create two constructors: one with no parameters and one with an IBookRepository parameter. Chain the default constructor to the one with a parameter, passing in new BookRepository. In the constructor with a parameter, set the field to the passed in value.

public class BookController : Controller
{
    private readonly IBookRepository repository;
 
    public BookController()
        this(new BookRepository())
    {
    }
 
    public BookController(IBookRepository repository)
    {
        this.repository = repository;
    }
 
    public ActionResult Index()
    {
        var books = repository.GetAll();
        return View(books);
    }
}

In the unit test, remove the call to IgnoreInstance() and pass the mocked repository into the BookController’s constructor.

[Fact]
public void Index_Should_Return_All_Books_To_View()
{
    var repository = Mock.Create<BookRepository>();
 
    repository.Arrange(r => r.GetAll())
              .Returns(Enumerable.Repeat<BookModel>(new BookModel(), 5));
 
    BookController controller = new BookController(repository);
    var result = (ViewResult)controller.Index();
    var books = (IEnumerable<BookModel>)result.Model;
    Assert.Equal(5, books.Count());
}

Conclusion

In this article, you learned how to mock objects without changing the code base. You also learned one of the easiest techniques for introducing dependency injection in your project while causing minimal changes to your existing tests. There’s a wide world of best practices for creating loosely coupled architectures that are conductive to unit testing. I hope this helps you get started… happy coding!

Performance optimization techniques in ReactJS

Summary: Helps to learn how to measure performance improvements. As the majority of modern web applications rely on what React.js brings to ...