We’ve all faced the problem of an ever-growing code base that slowly loses structure. Classes that were once small start to inflate, lines of code grow from hundreds to thousands, components become tightly coupled, and the single responsibility principle erodes. For a fast growing R&D department, this technical debt becomes ever more important to address in order to scale.
A bit of background: Datorama is a marketing intelligence platform that transforms the way marketers optimize their marketing performance, business impact, and customer loyalty. Founded back in 2012, we started off with 3 engineers, and have doubled our engineering head count year over year ever since. This exponential growth has, of course, come with some scaling challenges, and one evident challenge is how to keep an ever-growing code base organized and easy to use. In terms of our tech stack, being a data company, big parts of our platform are written in Java, some of those are written in Spring and most of our engineers use IntelliJ as their IDE.
We have two main efforts. Splitting the code into modules and micro-services. Modules and then micro-service is a great track to do it. So recently I made some refactoring in our code base splitting a part of a service to its own maven module. This service I was working on is built in Spring.
The specific problem we were facing lately is that parts of our codebase became too tightly coupled in a single, monolithic Maven module. It was not uncommon to stumble upon really long files (+2000 lines of code), there was no separation of concerns, and no single responsibility. Such a tightly coupled codebase also creates a ripple of side effects:
- Build time takes longer, since your entire code gets compiled even when changes in other classes are made, all because they’re in the same module. Don’t underestimate this, build time can take several minutes! (multiply by 10 it gets to ~1h per day!).
- When tests break it’s harder to understand why because everything is in the same module.
- Engineers become inefficient and unhappy because most of the time they get lost in those tough lines of code.
- The code becomes increasingly harder to modify and test.
In this post, I’d like to present a technique we’ve started using in order to tackle the ever-increasing code complexity by applying massive refactoring in a structured process:
Step 1: Define the Problem In Detail
We start by selecting a product module that can be split out, e.g. that is not strongly linked to other modules and can “live” independently.
This is not an easy task and the key to success is the ability to visualize your code’s structure and identify independent clusters. For this, we start out by using the excellent IntelliJ plugin — Java Method Reference Diagram. This plugin allows you to visualize a single class, showing you relationships between methods, fields and other classes in a usage graph. Put in their words, it provides you with:
“visual information about orphaned groups, meaning independent clusters of methods and fields that are candidates for refactoring to separate classes”
More often then not, once you choose a candidate class you’ll notice that when you first use this plugin the diagram looks like hell.

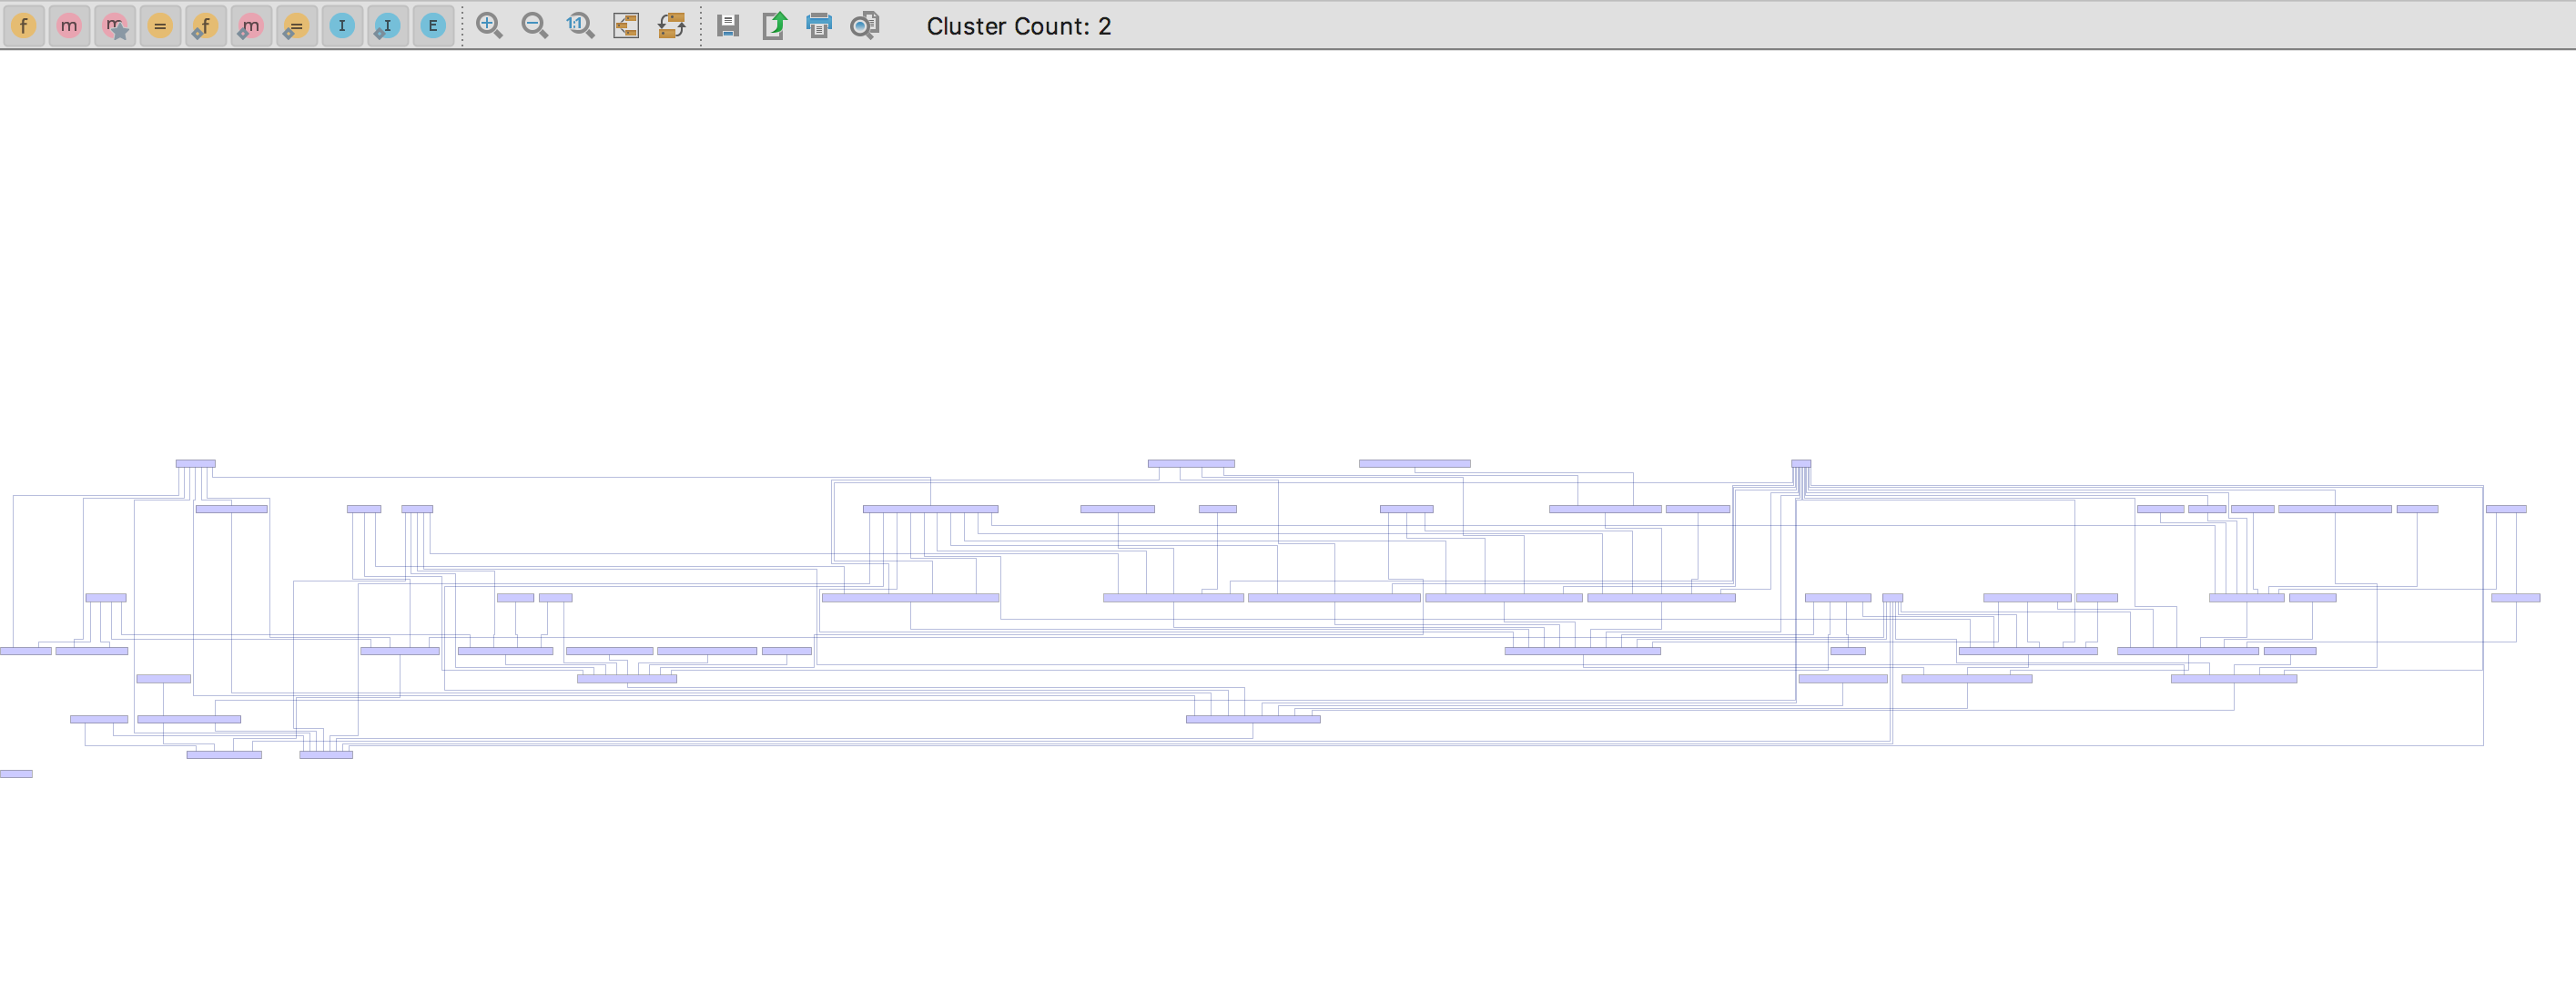
In order to simplify things and get better visibility, I’d suggest hiding all statics, members, interfaces and keep only methods. The reasoning for this is that statics can always be extracted to a shared classes and made public, while fields are usually dependency-injected with Spring’s @Autowired annotation, meaning they could also be injected elsewhere after we refactor.


Notice how the filtered diagram is cleaner than the original one, albeit still crowded. Now start looking for clusters which are candidates for extraction. This is the toughest step. Don’t underestimate it, be patient, the devil is in the details. Try stretching imaginary rectangles around blocks of interconnected methods with shared functionality:


Step 2: Structural Decomposition
Now that you have identified separated clusters, move them to their own services, that’s how we’ll solve all those issues stated in the beginning. We’ll achieve single responsibility and it will be much easier to modify and test this “new” code. A simple step-by-step here is:
- Create a new class, managed by Spring (annotated with @Service, @Component etc.)
- Move a cluster of methods as is from the original class to the new one.
- In the new class, resolve all dependencies of class members and static fields. You will most likely need to auto-wire services that were available in the original class.
- In the original class, auto-wire the new service class. Delegate all of the moved method calls to those methods in the new class, while changing methods in the new class to be public / protected.
- Find all usages in the code that were calling public methods in the original class and change them to call the same methods in the new class.
- Rinse and repeat.
If you really want to leverage your refactoring, after you’ve extracted your code, go over these steps again in your “new” code and see if there is room for more extractions. Your classes will become super neat and tidy.
Step 3: Identify Anti-Patterns:
I believe anti-patterns exist in every application codebase, some are hard to identify.
Explore your “new” code and take the effort to identify those anti-patterns.
For example in the code I extracted, I found some very long if/else blocks where each case in the block referenced to a specific type of action needed to be done. Here’s a simplified example:
Step 4: Replace with Design Patterns:
This code could be replaced with a very nice and clean design pattern called Command pattern.
From the link:
Command declares an interface for all commands, providing a simple execute() method which asks the Receiver of the command to carry out an operation. The Receiver has the knowledge of what to do to carry out the request. The Invoker holds a command and can get the Command to execute a request by calling the execute method. The Client creates ConcreteCommands and sets a Receiver for the command. The ConcreteCommand defines a binding between the action and the receiver. When the Invoker calls execute the ConcreteCommand will run one or more actions on the Receiver.
In our implementation of the command pattern, note how each concrete command implementation is defined as a Spring @Service. This will serve us later for auto-wiring these commands and build an enum map of them.


In conclusion, Identify your code candidate, extract it and improve its design. You’ll make your code more readable, maintainable, extendable and testable. On top of all of this, think that all this refactoring has relatively low risk since we’re just moving things around and keeping business logic untouched, it’s just the structure that changes.


