Thursday, May 9, 2024

Building a Backend for Frontend (BFF) For Your Microservices


APIs are, by design, vastly interconnected. In order to effectively function and carry out the purposes for their creation, APIs are crafted to connect easily to other services, both internal and external. While this certainly is beneficial from a user perspective, developers often find the result of this type of development to have some problematic elements.

Chief of these elements is that when microservices become more numerous, they become more reliant on each other. Each new microservice introduced into the ecosystem has its own methods of communication and work, and must be designed specifically to interact with every other dependent service.

Some strategies can be adopted to negate much of the negative points of this aspect of microservice architecture design. One method is to create a Backend for Frontend (BFF) shim to help organize microservice architectures and coordinate functionality across a diverse, wide system.

Today, we’re going to define exactly what a Backend for Frontend shim is, and how it does what it does. We’ll highlight some best practices to keep in mind while developing, and discuss some potential points of failure that must be carefully avoided.

What is a Backend for Frontend?

APIs are essentially a vast number of parts functioning in concert with one another toward a single goal. But the API designer often creates systems that, over time, reveal cracks or weaknesses that need to have a small piece of code to align everything the way it should be. The Backend for Frontend design pattern, as described by Phil Calçado, refers to the concept of developing niche backends for each user experience.

A Backend for Frontend is a unique type of shim that fills a design gap that is inherent in the API process. A BFF is, in simple terms, a layer between the user experience and the resources it calls on. When a mobile user requests data, in a BFF situation, their request is translated through the BFF and into a general layer below it. What this functionally means can be demonstrated in the following example.

3D Printing: Classic Approach

Let’s say you have a 3D printing business that takes orders and prints material on demand. In the traditional design, you would be looking at the following API flow:

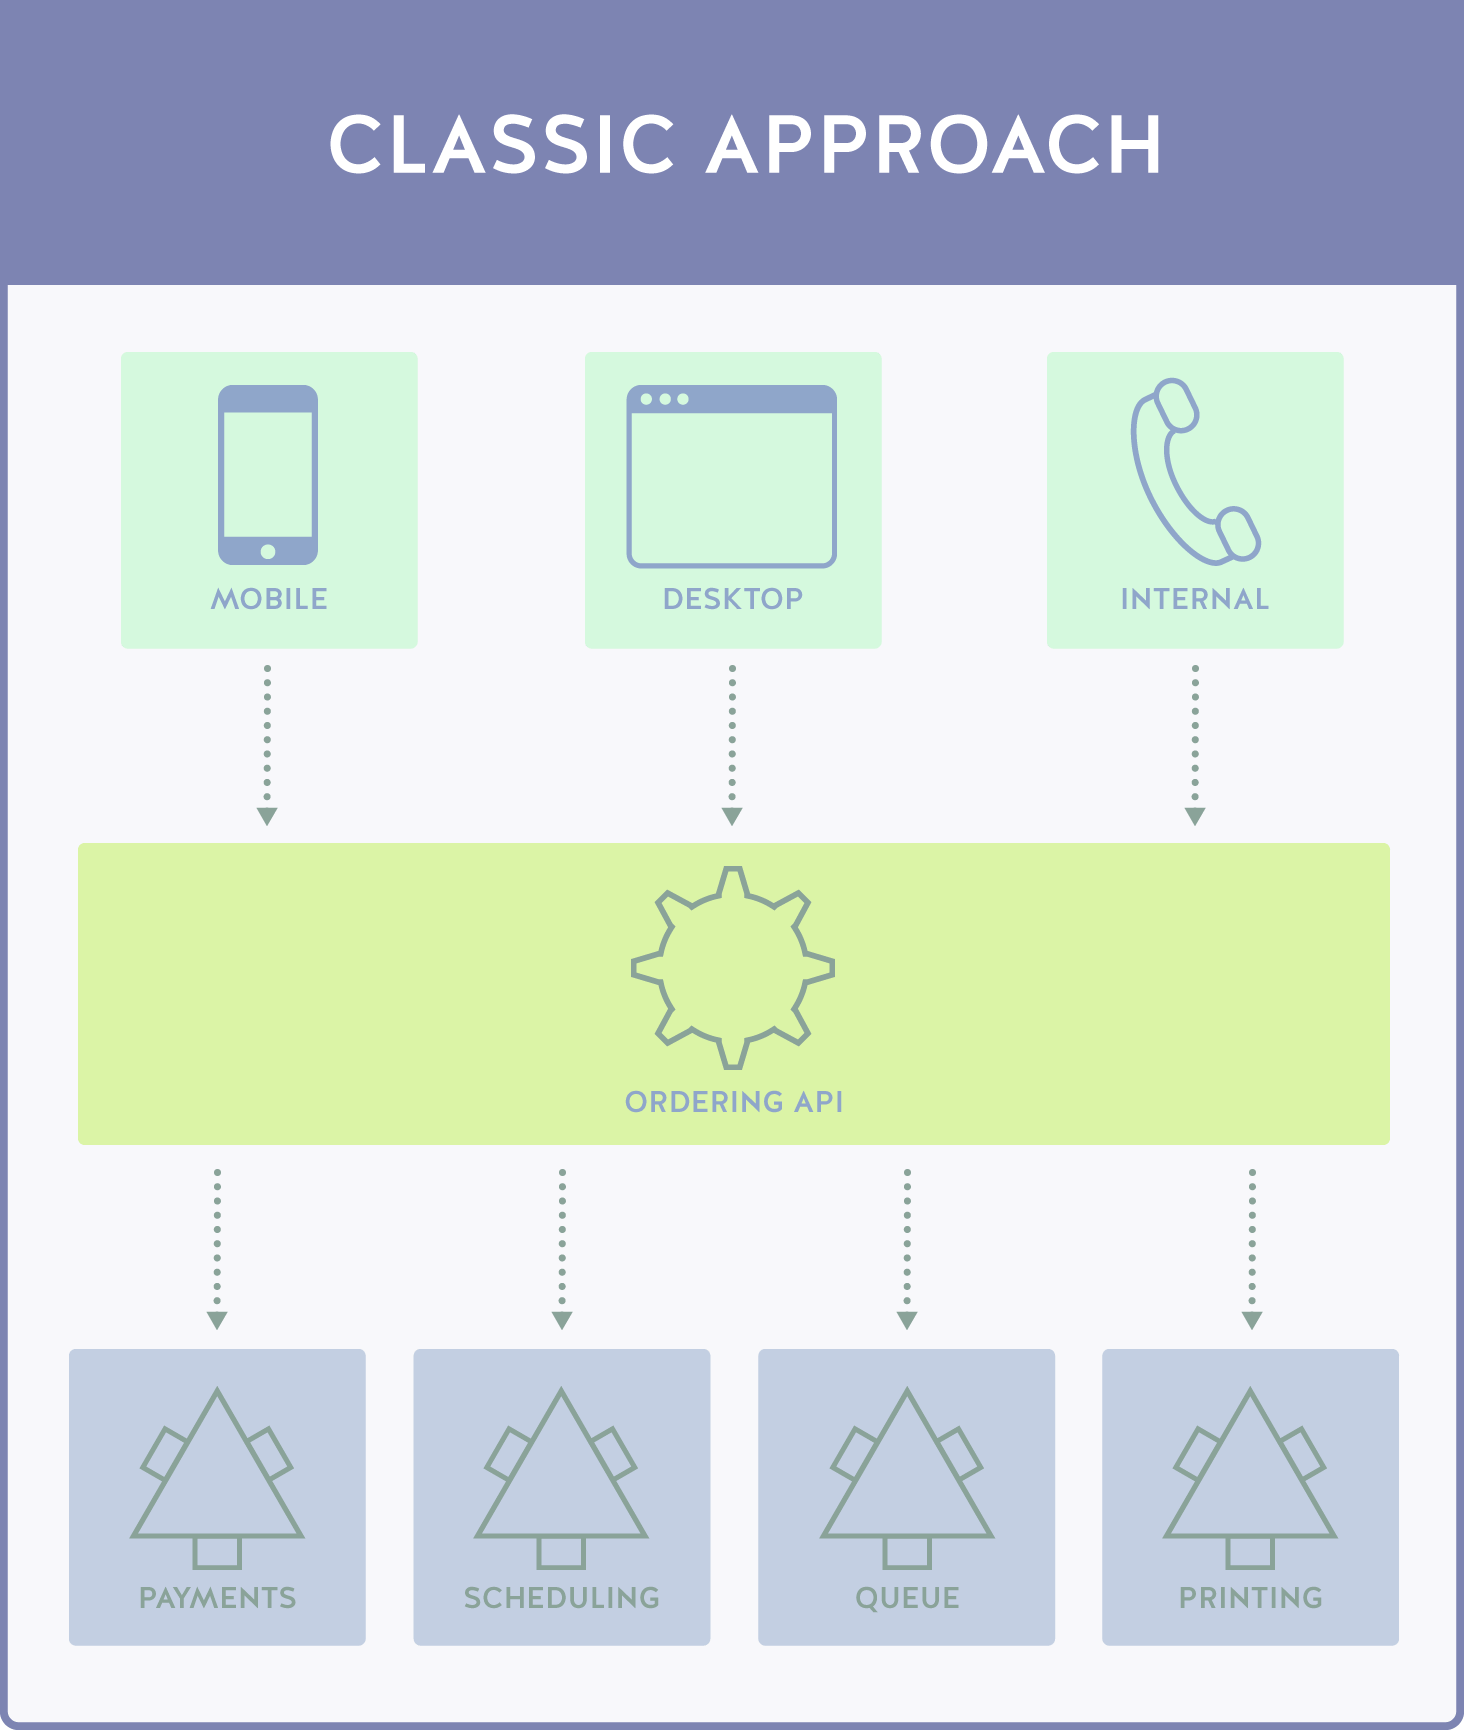
This type of architecture has several user types, each with different user experiences and API needs. The mobile user utilizes an application, the desktop user uses a web client, and internal orders are placed by customers calling into support, who manually adds the orders to the queue using an internal program.

Functionally, this is done by separating each of the functionalities into an application or web service, each of which call into a general API. The general API has instances of each object and call as needed by each service, and responds to the specific call type (which is denoted via a source entry) with the data required.

While this is certainly useable, it has some serious issues. Prime of course is the massive size of the Ordering API that is being called. The Ordering API not only has to contain all of the processes for the desktop and internal solutions, but has to handle each call from the mobile application with their own specific call functions, security systems, and media functionalities.

That’s not to say the combination of calls is necessarily the problem — the problem is specifically the nature of how these calls are handled. A single, large API navigating each call and calling to the same monolithic API is problematic and slow. Data needs to be presented in a specific format and language for the mobile solution, which is entirely separated from the desktop solution, resulting in multiple duplicate functions with slightly modified “tweaks”.

Another big problem is the fact that a single monolithic team is going to be responsible for the user experience of three diverse users, each with their own specific needs and experiences. Clumping everything together like this is messy, and has the effect of a bloated internal team.

3D Printing: Microservices Design

We can solve many of these issues through the following change in flow:

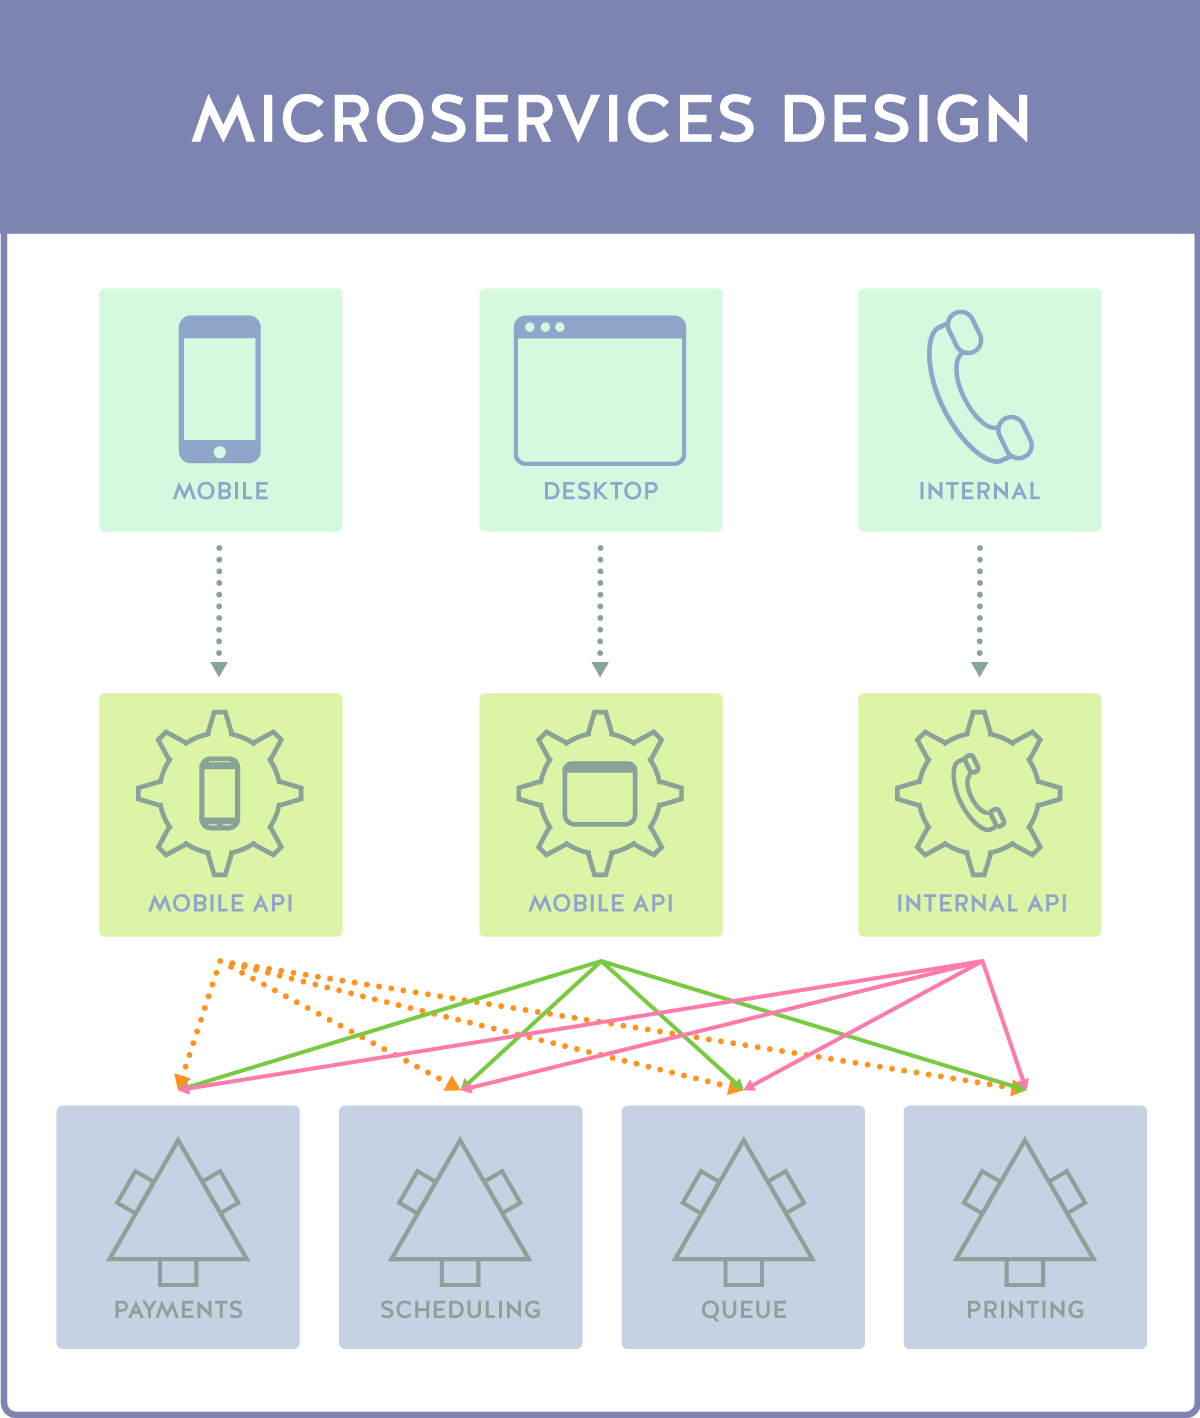
In this design, each application client type has its own dedicated API, effectively making a series of microservices specifically tailored to each user experience, unlike the first example, which relied on a general API. In this case, each call is pushed through a specific, isolated API, and then taps into the resources on the backend. So far so good, right? Not so fast. While many of the problems have been resolved, an entirely new system of issues have arisen.

The big issue here is microservice continuity. While we’ve separated a lot of functionality out in meaningful ways according to the user experience that will use them, we have three disparate APIs calling the same backend functions, which means a lot of duplication with code and functionality. Most importantly, as the API is updated and evolved, this will mean greater overhead both in terms of team economic and time cost and in the size and speed of the API.

We’ve traded one world of extremes for another. This is, in many ways, the current API landscape for most providers. Due to this, a wide variety of strategies have been used. One of them, and the one we’re discussing today, is the idea of a Backend for Frontend shim.

3D Printing: Backend for Frontend

What we’re conceptually talking about is a “translator” layer, a shim that takes disparate calls and allows it to be converted into a common form. While we’re adding a lot of conceptual layers in this example, do keep in mind the “shims” are rather small pieces of code, much smaller than the API as a whole.

While this kind of design might look like a carbon copy rebranding of the microservices architecture, what you’re actually seeing here is a layer of translation services. Each shim is maintained in concert with another by a “shim team”, with the Ordering API being managed by a single API team. Shouldn’t this cause the same problems we saw earlier?

The key difference here is in the handling of calls. In the “General API” design above, we had a single API containing variations on the initial data set triggered by source identifications. The problem was that each source had to have its own specialty call, and the data had to be manipulated by the API before being passed along.

In the microservices solution, we got around this by having individual APIs for each service, but problems persisted in the form of lacking continuity and the resultant team scope and size creep that followed.

In the shim approach, what we have is a group of disparate calls being translated into a single call. The different data type translations and systems are done during data handling from the API to the shim, essentially translating the service specific call into a general call*.

Not only does this alleviate the code base size and scope issues of both the general API and the teams that develop them, this also shifts processing power and responsibility to multiple services which can be designed and maintained by a single shim team.

We’re essentially creating a highway, and avoiding all of the surface and toll roads — which means better, more efficient throughput.

Best Practices

With all of this in mind, let’s discuss some best practices and general pitfalls to avoid when developing this kind of system.

Avoid Shim-to-API Conversion

One of the largest pitfalls a developer can fall into is to think of a shim in the same way one would think of a microservice. These two things are vastly different, and need to be coded as such.

When we talk about a translation shim, what we’re really talking about it something that simply states “when this data is returned, transform it from this type of data into the data type specified by the application.” We’re not talking about a self-contained, all inclusive API, we’re talking about a translation layer.

Shim Duplication

The entire point of creating a shim is for increased efficiency in the code base and to eliminate duplication, so it might seem strange that this is a pitfall to watch for. The reality is, however, that those new to shim development might consider a shim necessary for every unique user experience. But how granular should you be?

The missing piece here is that each user experience should be grouped by experience type, not by the source of the experience. For instance, a developer may want to develop separate shims for iOS, Android, Windows Mobile, and 3rd Party Mobile operating systems, thinking this would result in better performance.

The truth is that most of these mobile experiences can accept certain common data types, as the user experience is so similar. The application experience between operating systems is alike enough to not warrant their own individual shims.

Over Reliance on Shims

Related to the idea of Shim-to-API conversion, there is a definite threat of a shim becoming too much of a crutch. While it’s very tempting to use the shim concept as a front-line for security, for extended functionality, and more, a shim is only meant to be a shim — it’s not meant to serve as anything more than a layer of translation.

As such, try to avoid over-relying on the shim. The main API codebase should still handle all functionality and should still do all the things a properly API should do — the shim is supposed to fill a gap, not add functionality and services.

Provide What is Requested

As part of the BFF/shim development concept, each experience will only require certain items of data. Developers might consider the shim to be a filter as well as a translator, but that’s not what we want — the API should only provide the data requested by the shim.

Imagine a shopping front that catalogues items, and collates them with data including manufacturing date, type, frequency of purchase, etc. The mobile application might only need 10 of the 50 data objects that are contained in each entry, whereas the desktop application will need 40 of them, and the internal application will need all 50.

It’s tempting to have the shim itself strip the unneeded data out in transit, but this starts to push it towards being a functional API instead of a shim. This type of data handling should be done on the API level itself, using source triggers. Each shim should notify the API of the client type, and the API should respond to only requests for specific data sets, rather than supplying an entire data object.

This is specifically done as an approach to the initial code base — objects should be separated with the concept of shims and disparate user experiences in mind. Doing so will increase overall speed, reduce bandwidth, and increase experience satisfaction.

Conclusion

What’s important to keep in mind throughout all of this is that a shim is simply one solution to an almost universal architectural problem. While there are indeed other strategies, a shim is very effective when faced with a complex backend and a widely varying range of user experiences. To summarize the types of architectures we’ve covered:

  • In the classic design, we have a mobile call, a desktop call, and an internal call. All three of these calls require their own entries or at least a code set to handle conversion inside the General API.
  • In the microservices design, we have a mobile call, a desktop call, and an internal call. These calls individually interact with their own APIs, the Mobile API, the Desktop API, and the Internal API.
  • In the BFF shim design. We have a mobile call, a desktop call, and an internal call. These calls are each intercepted by the mobile shim, the desktop shim, and the internal shim. The shim converts the individual calls into a general call, which is then returned and translated by the calling shim, that is the shim that made the request.

Whether or not it can be properly implemented is an answer subject to the specific use case, backend architecture, and business approach for each individual service. That being said, a BFF can be incredibly powerful when used as it is meant to be used — a translative layer between disparate API services and experiences.

AUTHENTICATING TO AZURE AD PROTECTED APIS WITH MANAGED IDENTITY — NO KEY VAULT REQUIRED


Authenticating to Azure AD protected APIs with Managed Identity — No Key Vault required

A common way of authenticating to APIs, such as Microsoft Graph, has been that you set up an application registration in Azure AD, and create a client secret or a certificate. Then you store that sensitive information in an Azure Key Vault and have your application fetch it from there using its managed identity. After that, you’d use that fetched piece of information for authenticating to the API in your code. But did you know that there’s also an alternative way, which allows us to skip creating the application registration, client secret/certificate, and Azure Key Vault entirely?

We can allow our applications to authenticate to Azure AD protected APIs directly with the application managed identity. We don’t need to have a client secret or a certificate, and we can get rid of the risk of those pieces of sensitive information getting leaked. Otherwise, it works seemingly the same way by allowing us to use APIs with application permissions; it is just more secure.

Managed identity is not a new feature, and I know a few people have already blogged about this topic in the past. Still, I continue to run into developers who are not familiar with this approach. Based on my experience, it is clear that this method requires more exposure, which is why I am here writing about it for you. I hope you’ll find this article useful, and love using managed identity for authenticating to Azure AD protected APIs just as much as I do.

The Managed Service Identity (MSI) feature has been renamed to Managed identities for Azure resources. In this blog post, I’ll mostly be referring to this feature simply as managed identity.

WHAT ARE MANAGED IDENTITIES FOR AZURE RESOURCES?

A managed identity allows an Azure-hosted app to access other Azure AD protected services without having to specify explicit credentials for authentication. When you enable the managed identity for your app, a service principal gets created for your application in Azure AD. You can then grant that principal varying levels of permissions to the Azure resources and APIs used by your application. When we do not need to use and store separate credentials, it automatically improves the security of our application.

“When you enable managed identity on your web app, Azure activates a separate token-granting REST service specifically for use by your app. Your app will request tokens from this service instead of directly from Azure Active Directory. Your app needs to use a secret to access this service, but that secret is injected into your app’s environment variables by App Service when it starts up. You don’t need to manage or store this secret value anywhere, and nothing outside of your app can access this secret or the managed identity token service endpoint.” [source]

Managed identity is available for many Azure resources, such as Azure Functions, Web Apps and Logic Apps. You can check the Microsoft documentation for a full and up-to-date list of all the resource types that support managed identities.

SYSTEM ASSIGNED VS. USER ASSIGNED MANAGED IDENTITIES

We have two different types of managed identities: system assigned and user-assigned. Both of them work pretty much the same way from the authentication perspective, but they are administered quite differently. Being able to make the correct decision between them based on your scenario can help you reduce administrative overhead.

A system-assigned managed identity is always tied to just that one resource where it is enabled. You then control the permissions for that application individually. This is the preferred approach if your apps need different roles for different services.

A user assigned managed identity is created as a separate Azure resource. It can then be given permissions to services and added to multiple different Azure resources. This is the preferred approach if several apps need the same permissions to the same services.

Note that you don’t necessarily need to choose to use just either a system assigned or a user-assigned managed identity. Depending on the Azure resource, you can often combine both and use multiple user-assigned managed identities. You should always follow the principle of least privilege, and plan the permissions of the identities to be as fine-grained as possible.

ENABLING THE MANAGED IDENTITY FOR YOUR AZURE APPLICATION

You can enable the system managed service identity for an Azure resource by going to its Identity blade, changing the Status to On and then hitting Save. After saving, you’ll see a GUID in the Object ID field. This is the ID of the managed service identity. You’ll need the ID for managing your app’s permissions.

If you wish to use the user-assigned managed identities instead, you first need to create the User Assigned Managed Identity Azure resource, and then add it on the User assigned tab. You can see the object ID of the user assigned managed identity on its Overview blade.

Managed identity enabled

MANAGING YOUR APP’S PERMISSIONS TO THE API

A widespread approach has been to enable the managed identity so that your app can securely access sensitive information stored in an Azure Key Vault. We’d do this for, e.g., getting a client secret from the key vault for authenticating to Microsoft Graph. However, it is also possible for us to grant our application permissions directly to Microsoft Graph (and other APIs) with PowerShell, which essentially allows us to skip the whole Azure Key Vault step entirely. At the time of this writing, PowerShell is our only option for performing this task; there is no way to do it in the Azure Portal.

For managing your application’s permissions using PowerShell, you first need to install the Azure AD PowerShell module, if you have not yet done so. You can install the module by running Windows PowerShell as an administrator, and then executing command Install-Module AzureAD.

Before you run the scripts, replace the miObjectId variable value with the ID of your application managed identity. You can see the ID in the view where you enabled the feature.

Also, if you want to manage your application’s permissions to some other API than Microsoft Graph, replace the appId variable value with the ID of the other API. You can find the ID of the API in the Enterprise applications view in Azure AD. There, select All Applications as the Application type, and search for your API. Then copy the GUID from the Application ID column.

Enterprise applications view

ADDING PERMISSIONS

You can use the following script for granting permissions to an Azure AD protected API for your Azure-hosted app that has managed identity enabled. Replace the permissionsToAdd variable value with the API permissions/roles your application requires.

The user executing the script needs to have either Application administrator, Cloud application administrator or Global administrator role.

# Replace with your managed identity object ID
$miObjectID = "17707c90-dab4-483d-a57f-65e91ac3d94f"
# The app ID of the API where you want to assign the permissions
$appId = "00000003-0000-0000-c000-000000000000"
# The app IDs of the Microsoft APIs are the same in all tenants:
# Microsoft Graph: 00000003-0000-0000-c000-000000000000
# SharePoint Online: 00000003-0000-0ff1-ce00-000000000000
# Replace with the API permissions required by your app
$permissionsToAdd = "User.Read.All", "User.Invite.All", "GroupMember.ReadWrite.All"
Connect-AzureAD
$app = Get-AzureADServicePrincipal -Filter "AppId eq '$appId'"
foreach ($permission in $permissionsToAdd)
{
try {
$role = $app.AppRoles | where Value -Like $permission | Select-Object -First 1
New-AzureADServiceAppRoleAssignment -Id $role.Id -ObjectId $miObjectID -PrincipalId $miObjectID -ResourceId $app.ObjectId -ErrorAction Stop
}
catch {
if ($_.Exception.ErrorContent.Message.Value -notcontains "Permission being assigned already exists on the object") {
throw $_
}
}
}

CHECKING EXISTING PERMISSIONS

If you later need to check what permissions your app has to the API in question, you can do that with the following script. You can run this script without the administrator roles mentioned above.

# Replace with your managed identity object ID
$miObjectID = "17707c90-dab4-483d-a57f-65e91ac3d94f"
# The app ID of the API where you want to assign the permissions
$appId = "00000003-0000-0000-c000-000000000000"
# The app IDs of the Microsoft APIs are the same in all tenants:
# Microsoft Graph: 00000003-0000-0000-c000-000000000000
# SharePoint Online: 00000003-0000-0ff1-ce00-000000000000
Connect-AzureAD
$app = Get-AzureADServicePrincipal -Filter "AppId eq '$appId'"
$appRoles = Get-AzureADServiceAppRoleAssignment -ObjectId $app.ObjectId | where PrincipalId -eq $miObjectID
foreach ($appRole in $appRoles) {
$role = $app.AppRoles | where Id -eq $appRole.Id | Select-Object -First 1
write-host $role.Value
}

REMOVING PERMISSIONS

If your app no longer needs some of the permissions granted earlier, you can remove them individually with the following script.

# Replace with your managed identity object ID
$miObjectID = "17707c90-dab4-483d-a57f-65e91ac3d94f"
# The app ID of the API where you want to assign the permissions
$appId = "00000003-0000-0000-c000-000000000000"
# The app IDs of the Microsoft APIs are the same in all tenants:
# Microsoft Graph: 00000003-0000-0000-c000-000000000000
# SharePoint Online: 00000003-0000-0ff1-ce00-000000000000
# Replace with the permissions to remove
$permissionsToRemove = "Group.ReadWrite.All", "Sites.ReadWrite.All"
Connect-AzureAD
$app = Get-AzureADServicePrincipal -Filter "AppId eq '$appId'"
$appRoles = Get-AzureADServiceAppRoleAssignment -ObjectId $app.ObjectId | where PrincipalId -eq $miObjectID
foreach ($appRole in $appRoles) {
$role = $app.AppRoles | where Id -eq $appRole.Id | Select-Object -First 1
if ($permissionsToRemove.Contains($role.Value)) {
Remove-AzureADServiceAppRoleAssignment -ObjectId $app.ObjectId -AppRoleAssignmentId $appRole.ObjectId
}
}

AUTHENTICATING USING THE MANAGED SERVICE IDENTITY

Here I have a couple of examples for you of how to use a managed identity for authentication in your solution. First, we have a .NET Core solution, and then I’ll show you how we can easily authenticate in an Azure Logic App using its managed identity. Again, I’m using Microsoft Graph as the API in both of these examples.

.NET CORE

As the first thing, install the Microsoft.Azure.Services.AppAuthentication NuGet package to your project, and specify a matching using statement for your namespace: using Microsoft.Azure.Services.AppAuthentication;

The method below will get an access token for the specified API using the managed identity of the Azure resource where your app is running. The resourceUrl (the URL address of the API) is the only mandatory parameter. The second parameter appId should only be specified when you are using the user-assigned managed identity. When the second parameter is not provided, system-assigned managed identity will be used by default.

/// <summary>
/// Gets an access token using the managed identity of the Azure resource.
/// </summary>
/// <param name="resourceUrl">The URL of the API, e.g., https://graph.microsoft.com</param>
/// <param name="appId">Optional user assigned managed identity client ID. Defaults to system assigned identity.</param>
/// <returns>Returns the Bearer access token value</returns>
public async Task<string> GetAccessTokenAsync(string resourceUrl, string appId = null)
{
string connectionString = appId != null ? $"RunAs=App;AppId={appId}" : null;
var tokenProvider = new AzureServiceTokenProvider(connectionString);
return await tokenProvider.GetAccessTokenAsync(resourceUrl);
}

Note that the code snippet above does not work while you are debugging your code locally. After all, your app needs to have an Azure managed identity for authentication, which your app will only have when it is hosted in Azure. It is up to you to decide how you wish to implement authentication for local debugging. Alternatively, you can deploy your app to Azure and debug it remotely.

AZURE LOGIC APPS

Calling an API in Azure Logic Apps with the HTTP action by using a managed identity is super easy. You first add either a system-assigned or a user-assigned managed identity for your app — just like you would for any other Azure resource. Then, while configuring the HTTP action, you select Managed Identity as the authentication type and select the identity from the dropdown. The only thing that requires a bit of typing regarding authentication is the Audience which is the URL of the API you want to call.

Note that Azure Logic Apps can only have either a system-assigned or user-assigned managed identity; it can’t have both. Moreover, when using user-assigned managed identities, you can only add one identity to your app.

AFTERWORD

So, what do you think of using managed identities for authentication? They are pretty awesome, eh? If you have any thoughts, comments or questions about the topic, feel free to write about them to me using the comments section below. I genuinely hope you enjoyed reading this article and found it useful.

Also, if you’d like to consume more content from me, feel free to subscribe to my Insider (news)letter and follow me on your favourite social media platforms (TwitterYouTubeLinkedInGithub). I share different types of content on each one of them.

Thank you for reading, it is always appreciated, and until next time!

How Netflix Scales its API with GraphQL Federation (Part 1)

  Netflix is known for its loosely coupled and highly scalable microservice architecture. Independent services allow for evolving at differe...